SpringMail 邮件服务 - 第二章. JavaMailSender 核心用法 本章将带你从零开始搭建邮件发送功能,掌握纯文本、HTML、附件、内嵌图片四种核心场景,并学会排查生产环境中的常见错误。
本章学习路径
入门阶段 :5 分钟发出第一封邮件,建立信心进阶阶段 :掌握 HTML 邮件和动态模板实战阶段 :处理附件和内嵌图片的复杂场景排错阶段 :解决授权码、端口、编码等常见问题2.1. 快速上手:发送第一封纯文本邮件 很多教程喜欢先讲一堆理论,然后才让你写代码。我们反其道而行之:先让你在 5 分钟内发出第一封邮件,建立成就感,再回过头来理解背后的原理。
2.1.1. 引入 spring-boot-starter-mail 依赖 假设你已经有一个 Spring Boot 3.x 项目(如果没有,用 Spring Initializr 创建一个空项目即可)。
打开项目的 pom.xml 文件,在 <dependencies> 标签内添加以下依赖:
1 2 3 4 <dependency > <groupId > org.springframework.boot</groupId > <artifactId > spring-boot-starter-mail</artifactId > </dependency >
这个 Starter 会自动帮你引入以下内容:
jakarta.mail 核心库(邮件协议实现)spring-context-support(Spring 的邮件支持)JavaMailSender 接口及其实现类保存文件后,IDE 会自动下载依赖。如果你使用的是 Maven,可以在终端执行 mvn dependency:tree 查看依赖树,确认 jakarta.mail 已经被引入。
2.1.2. 配置 SMTP 服务器(以 QQ 邮箱为例) 在正式写代码之前,我们需要先配置 SMTP 服务器。这里以 QQ 邮箱为例,因为它在国内使用广泛,且配置相对简单。
步骤 1:开启 QQ 邮箱的 SMTP 服务
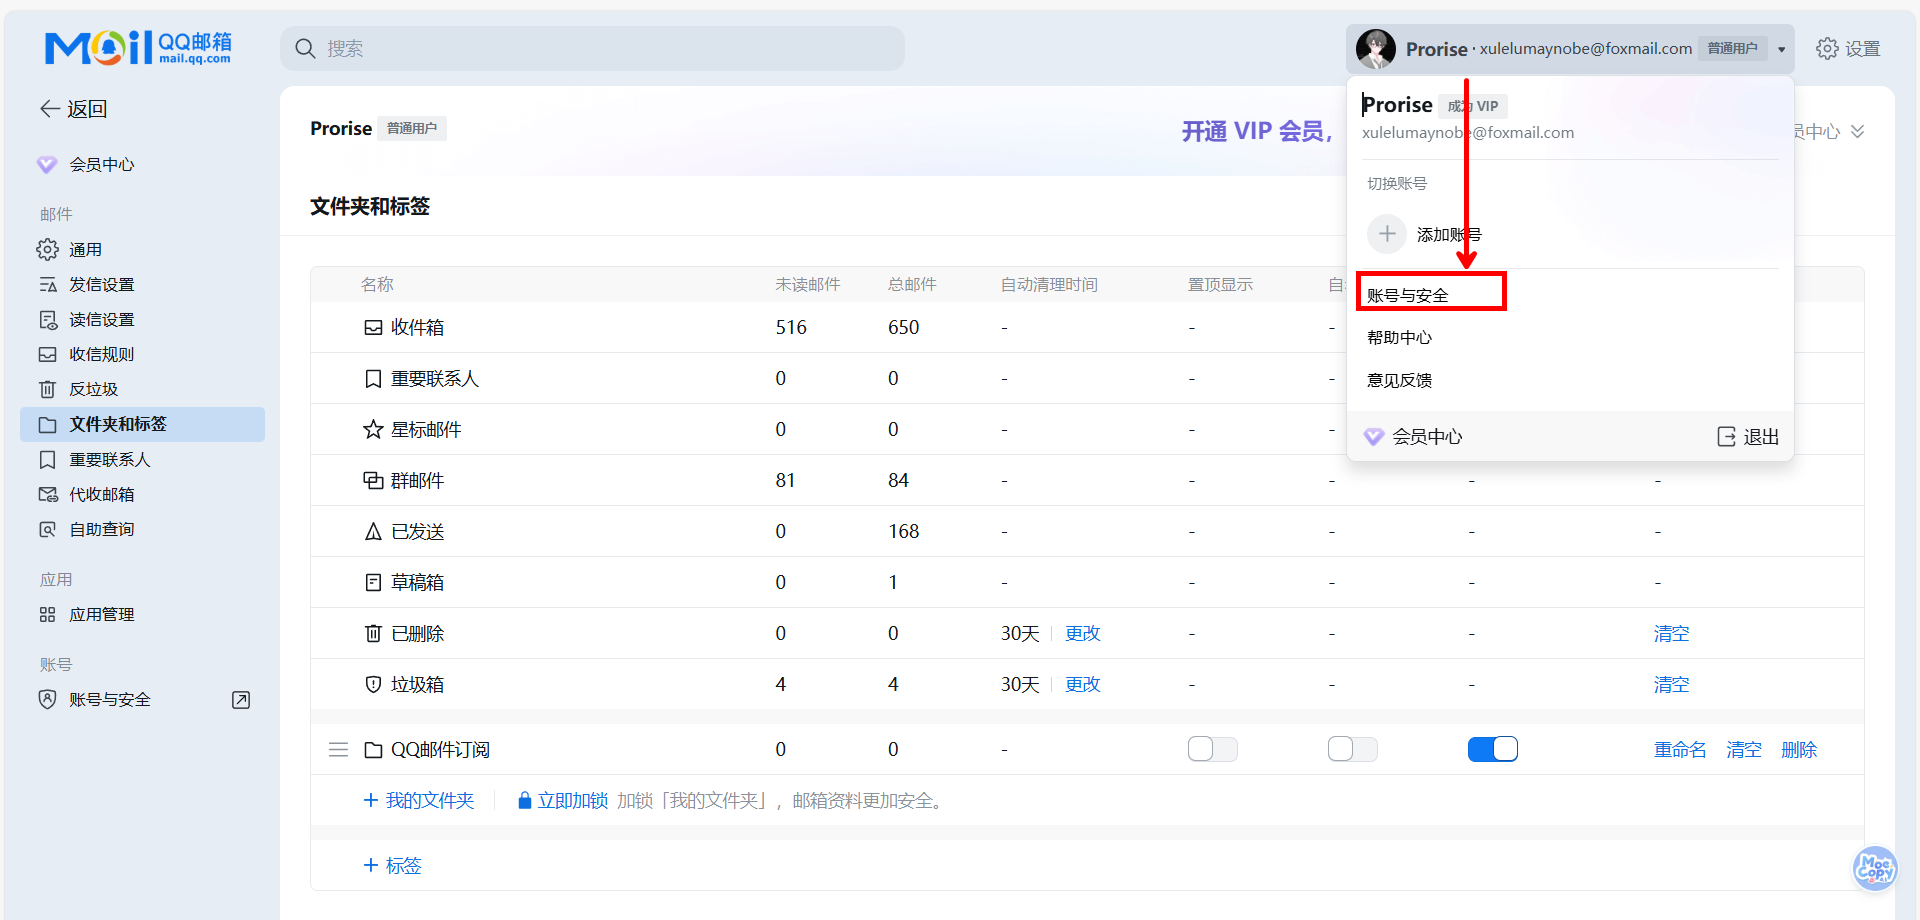
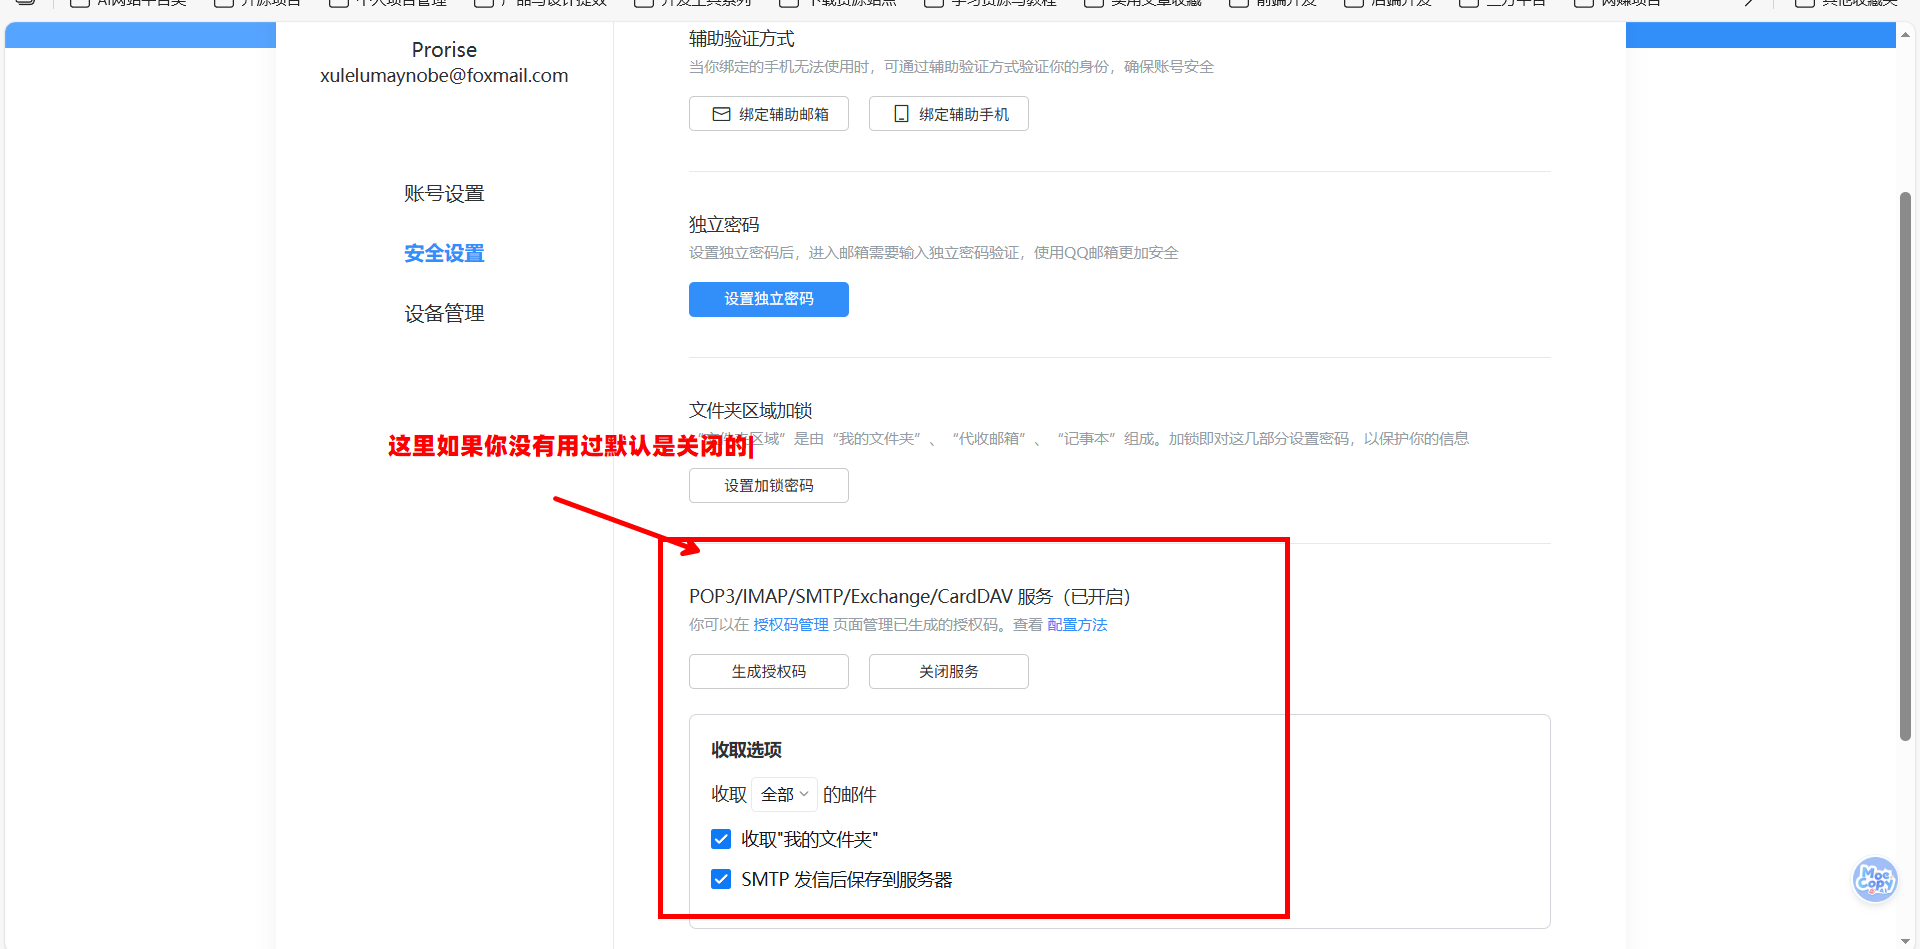
登录 QQ 邮箱网页版(mail.qq.com ),点击顶部的 “设置” → “账户”,找到 “POP3/IMAP/SMTP/Exchange/CardDAV/CalDAV 服务” 这一栏。
你会看到 “SMTP 服务” 默认是关闭的。点击 “开启” 按钮,QQ 会要求你发送一条短信验证身份。验证通过后,QQ 会生成一个 授权码 (一串 16 位的字符,类似 abcdefghijklmnop)。
重要 :这个授权码不是你的 QQ 密码!它是专门用于第三方客户端登录的临时密码。请妥善保管,不要泄露给他人。
步骤 2:配置 Spring Boot
打开 src/main/resources/application.yml(如果是 .properties 格式也可以,但我们推荐 YAML),添加以下配置:
1
2
3
4
5
6
7
8
9
10
11
12
13
spring: mail: host: smtp.qq.com port: 587 username: 你的QQ邮箱@qq.com password: 刚才获取的授权码 properties: mail: smtp: auth: true starttls: enable: true required: true
配置解读:
host:QQ 邮箱的 SMTP 服务器地址port:587 是 STARTTLS 加密端口(也可以用 465 的 SSL 端口,稍后会讲区别)username:你的完整邮箱地址password:不是 QQ 密码,是授权码 mail.smtp.auth:开启身份验证(现代 SMTP 服务器都强制要求)mail.smtp.starttls.enable:开启 STARTTLS 加密mail.smtp.starttls.required:强制要求加密(如果服务器不支持加密,连接会失败)安全提示 :不要把授权码直接写在配置文件中提交到 Git!生产环境应该使用环境变量或配置中心(如 Nacos、Apollo)管理敏感信息。
2.1.3. 使用 SimpleMailMessage 发送邮件 配置完成后,我们就可以写代码了。创建一个 Service 类来封装邮件发送逻辑:
📄 文件:src/main/java/com/example/demo/service/MailService.java
1
2
3
4
5
6
7
8
9
10
11
12
13
14
15
16
17
18
19
20
21
22
23
24
25
26
27
28
29
30
31
32
33
34
35
36
package com.example.demo.service;import lombok.RequiredArgsConstructor;import org.springframework.mail.SimpleMailMessage;import org.springframework.mail.javamail.JavaMailSender;import org.springframework.stereotype.Service;@Service @RequiredArgsConstructor public class MailService { private final JavaMailSender mailSender; public void sendSimpleText (String to, String subject, String content) { SimpleMailMessage message = new SimpleMailMessage (); message.setFrom("3381292732@qq.com" ); message.setTo(to); message.setSubject(subject); message.setText(content); mailSender.send(message); } }
代码解读:
依赖注入 :JavaMailSender 是 Spring Boot 自动配置的 Bean,我们直接注入即可SimpleMailMessage :这是 Spring 提供的简单邮件对象,只能发送纯文本setFrom :发件人必须与配置文件中的 username 一致,否则 SMTP 服务器会拒绝发送send :调用这个方法时,Spring 会连接 SMTP 服务器并发送邮件现在写一个测试类验证功能:
📄 文件:src/test/java/com/example/demo/service/MailServiceTest.java
1
2
3
4
5
6
7
8
9
10
11
12
13
14
15
16
17
18
19
20
21
22
23
package com.example.demo.service;import org.junit.jupiter.api.Test;import org.springframework.beans.factory.annotation.Autowired;import org.springframework.boot.test.context.SpringBootTest;@SpringBootTest class MailServiceTest { @Autowired private MailService mailService; @Test void testSendSimpleText () { mailService.sendSimpleText( "3381292732@qq.com" , "来自 Spring Boot 的第一封邮件" , "恭喜你!邮件发送功能已经跑通了。" ); System.out.println("邮件发送成功,请检查收件箱" ); } }
运行这个测试方法,如果控制台没有报错,说明邮件已经发送成功。打开收件人的邮箱,你应该能看到这封邮件。
2.1.4. 常见错误与排查 在实际开发中,邮件发送功能最容易出错的环节就是配置。我们总结了三类高频错误及其解决方案。
错误一:535 Authentication failed(认证失败)
完整错误信息:
1 jakarta.mail.AuthenticationFailedException: 535 Login Fail. Please enter your authorization code to login.
中文翻译:认证失败,请输入授权码登录。
这个错误有三种可能:
密码填错了 :检查 application.yml 中的 password 是否是授权码(不是 QQ 密码)用户名格式错误 :username 必须是完整邮箱地址(如 123456@qq.com),不能只写 QQ 号授权码过期 :QQ 邮箱的授权码长期不用会失效,重新生成一个即可错误二:Connection timed out(连接超时)
完整错误信息:
1
2
org.springframework.mail.MailSendException: Mail server connection failed; nested exception is jakarta.mail.MessagingException: Could not connect to SMTP host: smtp.qq.com, port: 587
中文翻译:无法连接到 SMTP 服务器。
这个错误通常是网络问题:
防火墙拦截 :公司网络或云服务器可能禁用了 SMTP 端口,尝试切换到 465 端口服务器地址错误 :检查 host 是否拼写正确(smtp.qq.com 不是 mail.qq.com)本地网络问题 :尝试 telnet smtp.qq.com 587 测试端口是否通畅错误三:501 Mail from address must be same as authorization user(发件人不一致)
完整错误信息:
1 jakarta.mail.SendFailedException: 501 Mail from address must be same as authorization user
中文翻译:发件人地址必须与认证用户一致。
这是因为 message.setFrom() 中的邮箱地址与 application.yml 中的 username 不一致。SMTP 服务器为了防止伪造发件人,会强制校验这两个地址必须相同。
解决方案:确保代码中的 setFrom 使用的邮箱与配置文件中的 username 完全一致。
2.2. 进阶实战:发送 HTML 邮件 纯文本邮件虽然简单,但在实际业务中,我们更多需要发送带样式的 HTML 邮件,比如订单确认、营销邮件、数据报表等。
2.2.1. MimeMessage 与 MimeMessageHelper 的关系 在第一章中我们提到,MIME 格式让邮件支持 HTML 和附件。在 Spring 中,发送 MIME 格式邮件需要使用 MimeMessage 对象。
但直接操作 MimeMessage 非常繁琐,你需要手动设置 Content-Type、编码、边界符等底层细节。Spring 提供了 MIME 消息助手简化 MimeMessage 构建的工具类,封装了常用操作 ,让我们可以用更简洁的 API 构建复杂邮件。
两者的关系可以类比为:
MimeMessage:原始的 JDBC Connection(功能强大但难用)MimeMessageHelper:Spring 的 JdbcTemplate(封装了常用操作)在 MailService 中添加一个发送 HTML 邮件的方法:
1
2
3
4
5
6
7
8
9
10
11
12
13
14
15
16
17
18
19
20
21
22
23
24
25
26
27
28
29
30
31
32
33
import jakarta.mail.MessagingException;import jakarta.mail.internet.MimeMessage;import org.springframework.mail.javamail.MimeMessageHelper;public void sendHtmlMail (String to, String subject, String htmlContent) { try { MimeMessage mimeMessage = mailSender.createMimeMessage(); MimeMessageHelper helper = new MimeMessageHelper (mimeMessage, true , "UTF-8" ); helper.setFrom("你的QQ邮箱@qq.com" ); helper.setTo(to); helper.setSubject(subject); helper.setText(htmlContent, true ); mailSender.send(mimeMessage); } catch (MessagingException e) { throw new RuntimeException ("HTML 邮件发送失败" , e); } }
代码解读:
createMimeMessage :创建一个空的 MIME 消息对象MimeMessageHelper 构造器 :第一个参数:要操作的 MimeMessage 第二个参数:true 表示支持 multipart(附件、内嵌图片) 第三个参数:字符编码(强烈建议显式指定 UTF-8) setText 的第二个参数 :true 表示内容是 HTML,false 表示纯文本2.2.2. 发送基础 HTML 邮件(零依赖方案) 现在我们可以发送 HTML 邮件了。最简单的方式是直接在代码中构建 HTML 字符串。
适用场景 :邮件结构简单、变量少(1-3 个)、不需要复杂样式。
1 2 3 4 5 6 7 8 9 10 11 12 13 14 15 16 17 18 19 20 21 22 public void sendVerificationCode (String to, String code) { String htmlContent = String.format( "<html>" + "<body style='font-family: Arial, sans-serif;'>" + " <div style='background-color: #f4f4f4; padding: 20px;'>" + " <div style='background-color: white; padding: 30px; border-radius: 8px;'>" + " <h2 style='color: #333;'>验证码</h2>" + " <p>您的验证码是:</p>" + " <div style='font-size: 32px; font-weight: bold; color: #4CAF50; letter-spacing: 5px;'>%s</div>" + " <p style='color: #666; margin-top: 20px;'>验证码5分钟内有效,请勿泄露给他人。</p>" + " </div>" + " </div>" + "</body>" + "</html>" , code ); sendHtmlMail(to, "验证码" , htmlContent); }
这种方式的优点是:
零依赖 :不需要引入任何模板引擎性能高 :没有模板解析开销调试方便 :HTML 就在代码里,一眼看清缺点是:
HTML 和 Java 代码混在一起,可读性差 如果邮件结构复杂(超过 50 行 HTML),维护困难 2.2.3. HTML 模板管理的三种方案 当邮件内容变复杂时(比如订单确认邮件有十几个变量、复杂的表格),我们需要将 HTML 模板独立管理。
方案一:读取 HTML 文件 + 占位符替换(推荐轻量级场景)
这是最轻量的模板方案,不需要引入任何第三方库。
步骤 1:创建 HTML 模板文件
在 src/main/resources/templates 目录下创建 order-confirmation.html:
1
2
3
4
5
6
7
8
9
10
11
12
13
14
15
16
17
18
19
20
21
22
23
24
25
26
27
28
<!DOCTYPE html > <html > <head > <meta charset ="UTF-8" > <style > body { font-family : Arial, sans-serif; background-color : #f4f4f4 ; padding : 20px ; } .container { background-color : white; padding : 30px ; border-radius : 8px ; } .header { color : #333 ; border-bottom : 2px solid #4CAF50 ; padding-bottom : 10px ; } .info { margin : 20px 0 ; line-height : 1.8 ; } .amount { color : #e74c3c ; font-weight : bold; } </style > </head > <body > <div class ="container" > <h2 class ="header" > 订单确认通知</h2 > <div class ="info" > <p > 尊敬的 <strong > {{customerName}}</strong > ,您好!</p > <p > 您的订单已成功提交,订单详情如下:</p > <ul > <li > 订单号:<strong > {{orderNo}}</strong > </li > <li > 下单时间:{{orderTime}}</li > <li > 订单金额:<span class ="amount" > ¥{{amount}}</span > </li > </ul > <p > 我们将尽快为您处理订单,感谢您的支持!</p > </div > </div > </body > </html >
步骤 2:在 Service 中加载并替换占位符
1
2
3
4
5
6
7
8
9
10
11
12
13
14
15
16
17
18
19
20
21
22
23
24
25
26
27
28
29
30
31
import java.io.IOException;import java.io.InputStream;import java.nio.charset.StandardCharsets;public void sendOrderConfirmation (String to, String customerName, String orderNo, String orderTime, String amount) { try { InputStream inputStream = getClass().getResourceAsStream("/templates/order-confirmation.html" ); if (inputStream == null ) { throw new RuntimeException ("模板文件不存在" ); } String template = new String (inputStream.readAllBytes(), StandardCharsets.UTF_8); String htmlContent = template .replace("{{customerName}}" , customerName) .replace("{{orderNo}}" , orderNo) .replace("{{orderTime}}" , orderTime) .replace("{{amount}}" , amount); sendHtmlMail(to, "订单确认通知" , htmlContent); } catch (IOException e) { throw new RuntimeException ("读取邮件模板失败" , e); } }
这种方案的优点:
零依赖 :不需要引入模板引擎HTML 独立管理 :前端开发者可以直接编辑 HTML 文件性能好 :只是简单的字符串替换缺点:
不支持复杂逻辑(如循环、条件判断) 占位符多了容易出错 适用场景 :变量在 10 个以内、没有复杂逻辑的邮件。
方案二:使用项目已有的模板引擎(复用现有依赖)
如果你的项目是 Web 应用,已经引入了 Thymeleaf 或 Freemarker 做页面渲染,那么复用它们做邮件模板是最自然的选择。
情况 A:项目已有 Thymeleaf
修改模板文件,使用 Thymeleaf 语法:
1 2 <p > 尊敬的 <strong th:text ="${customerName}" > 客户</strong > ,您好!</p > <li > 订单号:<strong th:text ="${orderNo}" > ORD001</strong > </li >
在 Service 中注入 TemplateEngine:
1
2
3
4
5
6
7
8
9
10
11
12
13
14
15
16
17
18
19
20
21
22
23
24
25
26
27
28
29
30
31
32
import org.springframework.beans.factory.annotation.Autowired;import org.thymeleaf.TemplateEngine;import org.thymeleaf.context.Context;@Service public class MailService { private final JavaMailSender mailSender; private final TemplateEngine templateEngine; public MailService (JavaMailSender mailSender, @Autowired(required = false) TemplateEngine templateEngine) { this .mailSender = mailSender; this .templateEngine = templateEngine; } public void sendOrderConfirmation (String to, String customerName, String orderNo, String orderTime, String amount) { if (templateEngine == null ) { throw new RuntimeException ("项目未引入 Thymeleaf,请使用其他方案" ); } Context context = new Context (); context.setVariable("customerName" , customerName); context.setVariable("orderNo" , orderNo); context.setVariable("orderTime" , orderTime); context.setVariable("amount" , amount); String htmlContent = templateEngine.process("order-confirmation" , context); sendHtmlMail(to, "订单确认通知" , htmlContent); } }
情况 B:项目已有 Freemarker
模板语法改为 Freemarker:
1 2 <p > 尊敬的 <strong > ${customerName}</strong > ,您好!</p > <li > 订单号:<strong > ${orderNo}</strong > </li >
在 Service 中注入 Configuration:
1
2
3
4
5
6
7
8
9
10
11
12
13
14
15
16
17
18
19
20
21
22
23
24
25
26
27
28
29
30
import freemarker.template.Configuration;import freemarker.template.Template;import java.io.StringWriter;@Service public class MailService { private final JavaMailSender mailSender; private final Configuration freemarkerConfig; public MailService (JavaMailSender mailSender, @Autowired(required = false) Configuration freemarkerConfig) { this .mailSender = mailSender; this .freemarkerConfig = freemarkerConfig; } public void sendOrderConfirmation (String to, Map<String, Object> data) { try { Template template = freemarkerConfig.getTemplate("order-confirmation.ftl" ); StringWriter writer = new StringWriter (); template.process(data, writer); String htmlContent = writer.toString(); sendHtmlMail(to, "订单确认通知" , htmlContent); } catch (Exception e) { throw new RuntimeException ("邮件模板渲染失败" , e); } } }
方案三:引入轻量级模板引擎(仅为邮件服务)
如果项目是纯后端服务(没有 Web 页面),但邮件模板确实很复杂(需要循环、条件判断),可以考虑引入轻量级的模板引擎。
推荐 Mustache (比 Thymeleaf 轻量 10 倍):
1 2 3 4 5 <dependency > <groupId > com.github.spullara.mustache.java</groupId > <artifactId > compiler</artifactId > <version > 0.9.10</version > </dependency >
模板语法(order-confirmation.mustache):
1 2 3 4 5 6 <p > 尊敬的 <strong > {{customerName}}</strong > ,您好!</p > <ul > {{#items}} <li > {{name}} x {{quantity}}</li > {{/items}} </ul >
使用代码:
1
2
3
4
5
6
7
8
9
10
11
12
13
14
15
import com.github.mustachejava.DefaultMustacheFactory;import com.github.mustachejava.Mustache;import com.github.mustachejava.MustacheFactory;import java.io.StringWriter;public void sendOrderConfirmation (String to, Map<String, Object> data) { MustacheFactory mf = new DefaultMustacheFactory (); Mustache mustache = mf.compile("templates/order-confirmation.mustache" ); StringWriter writer = new StringWriter (); mustache.execute(writer, data); String htmlContent = writer.toString(); sendHtmlMail(to, "订单确认通知" , htmlContent); }
2.2.4. 选型建议:什么场景用什么方案 项目类型 邮件复杂度 推荐方案 理由 任何项目 简单(变量 ≤ 3) String.format() 零依赖,性能最高 任何项目 中等(变量 ≤ 10) HTML 文件 + 占位符替换 零依赖,HTML 独立管理 Web 应用(已有 Thymeleaf) 任意 复用 Thymeleaf 不增加依赖 Web 应用(已有 Freemarker) 任意 复用 Freemarker 不增加依赖 纯后端服务 复杂(需要循环/判断) 引入 Mustache 轻量级(200KB) 纯后端服务 简单/中等 HTML 文件 + 占位符替换 零依赖
核心原则 :
能不引入依赖就不引入 :邮件模板不是核心业务,不值得为它增加包体积复用现有技术栈 :如果项目已有模板引擎,直接用从简单开始 :先用占位符替换,不够用再升级2.3. 附件处理的正确姿势 在业务系统中,我们经常需要发送带附件的邮件,比如合同、发票、报表等。
2.3.1. 添加单个附件 在 MailService 中添加发送附件的方法:
1
2
3
4
5
6
7
8
9
10
11
12
13
14
15
16
17
18
19
20
21
22
23
24
25
26
27
28
29
30
import org.springframework.core.io.FileSystemResource;import java.io.File; public void sendMailWithAttachment (String to, String subject, String content, String filePath) throws MessagingException { MimeMessage mimeMessage = mailSender.createMimeMessage(); MimeMessageHelper helper = new MimeMessageHelper (mimeMessage, true , "UTF-8" ); helper.setFrom("3381292732@qq.com" ); helper.setTo(to); helper.setSubject(subject); helper.setText(content); File file = new File (filePath); if (file.exists()) { FileSystemResource resource = new FileSystemResource (file); helper.addAttachment(file.getName(), resource); } else { throw new RuntimeException ("附件文件不存在:" + filePath); } mailSender.send(mimeMessage); }
代码解读:
FileSystemResource :Spring 提供的文件资源抽象,支持从文件系统、classpath、URL 等多种来源加载文件addAttachment :第一个参数是附件在邮件中显示的名称(可以与实际文件名不同),第二个参数是文件资源测试代码:
1
2
3
4
5
6
7
8
9
10
11
@Test void testSendMailWithAttachment () throws MessagingException { mailService.sendMailWithAttachment( "收件人邮箱@example.com" , "月度报表" , "请查收本月的销售数据报表。" , "/Users/yourname/Documents/report.pdf" ); System.out.println("带附件邮件发送成功" ); }
2.3.2. 批量添加附件 如果需要添加多个附件,可以循环调用 addAttachment:
1 2 3 4 5 6 7 8 9 10 11 12 13 14 15 16 17 18 19 20 21 22 23 24 25 26 27 28 29 public void sendMailWithMultipleAttachments (String to, String subject, String content, List<String> filePaths) { try { MimeMessage mimeMessage = mailSender.createMimeMessage(); MimeMessageHelper helper = new MimeMessageHelper (mimeMessage, true , "UTF-8" ); helper.setFrom("你的QQ邮箱@qq.com" ); helper.setTo(to); helper.setSubject(subject); helper.setText(content); for (String filePath : filePaths) { File file = new File (filePath); if (file.exists()) { FileSystemResource resource = new FileSystemResource (file); helper.addAttachment(file.getName(), resource); } } mailSender.send(mimeMessage); } catch (MessagingException e) { throw new RuntimeException ("批量附件邮件发送失败" , e); } }
2.3.3. 附件中文名乱码问题 当附件文件名包含中文时,某些邮件客户端(如 Outlook)可能会显示乱码。这是因为 MIME 标准要求文件名必须编码。
Spring 的 MimeMessageHelper 已经自动处理了这个问题
在大多数情况下,直接使用 helper.addAttachment(file.getName(), resource) 就足够了,Spring 会自动处理编码。
2.4. 内嵌图片:让 HTML 邮件更美观 有时候我们希望在 HTML 邮件中直接显示图片(比如公司 Logo、产品图片),而不是作为附件。这就需要使用 内嵌图片 技术。
2.4.1. 什么是 CID(Content-ID) Content-ID内容标识符,用于在 HTML 中引用邮件内嵌的资源 内嵌图片的原理是:将图片作为邮件的一部分(而不是附件),然后在 HTML 中通过 cid: 协议引用它。
举个例子,假设我们内嵌了一张图片,给它分配的 CID 是 logo,那么在 HTML 中可以这样引用:
1 <img src ="cid:logo" alt ="公司Logo" />
邮件客户端看到 cid:logo 时,会在邮件内部查找 CID 为 logo 的资源并显示。
2.4.2.使用 addInline 嵌入图片 在 MailService 中添加发送带内嵌图片的邮件方法:
1 2 3 4 5 6 7 8 9 10 11 12 13 14 15 16 17 18 19 20 21 22 23 24 25 26 27 public void sendHtmlMailWithInlineImage (String to, String subject) throws MessagingException { MimeMessage mimeMessage = mailSender.createMimeMessage(); MimeMessageHelper helper = new MimeMessageHelper (mimeMessage, true , "UTF-8" ); helper.setFrom("3381292732@qq.com" ); helper.setTo(to); helper.setSubject(subject); String htmlContent = "<html><body>" + "<h2>欢迎使用我们的服务</h2>" + "<p>这是我们的公司 Logo:</p>" + "<img src='cid:companyLogo' style='width:200px;' />" + "<p>感谢您的支持!</p>" + "</body></html>" ; helper.setText(htmlContent, true ); ClassPathResource logoResource = new ClassPathResource ("static/images/logo.png" ); helper.addInline("companyLogo" , logoResource); mailSender.send(mimeMessage); }
代码解读:
HTML 中的引用 :<img src='cid:companyLogo' /> 中的 companyLogo 是我们自定义的标识符addInline :第一个参数必须与 HTML 中 cid: 后面的名称完全一致(区分大小写)ClassPathResource :从项目的 src/main/resources 目录加载图片在使用前,需要在 src/main/resources/static/images/ 目录下放置一张名为 logo.png 的图片。
2.4.3. 图片资源的加载方式 Spring 提供了多种资源加载方式,适应不同的场景:
方式一:从 classpath 加载(推荐)
适用于项目内置的静态资源(如 Logo、图标):
1
2
ClassPathResource resource = new ClassPathResource ("static/images/logo.png" );helper.addInline("logo" , resource);
方式二:从文件系统加载
适用于动态生成的图片(如用户上传的头像、临时生成的图表):
1
2
FileSystemResource resource = new FileSystemResource ("/var/data/user-avatar.jpg" );helper.addInline("avatar" , resource);
方式三:从 URL 加载
适用于外部图片(如 CDN 上的资源):
1
2
UrlResource resource = new UrlResource ("https://example.com/images/banner.jpg" );helper.addInline("banner" , resource);
方式四:从字节数组加载
适用于内存中的图片数据(如从数据库读取的二进制数据):
1
2
3
byte [] imageBytes = ...; ByteArrayResource resource = new ByteArrayResource (imageBytes);helper.addInline("photo" , resource);
内嵌图片的疑问
2026-01-15 16:00
老师,内嵌图片和附件有什么区别?我看代码都是用 helper 添加资源。
teacher
核心区别在于方法名和用途。addAttachment 添加的是附件,会显示在邮件底部的附件列表中,用户需要点击下载。addInline 添加的是内嵌资源,直接在 HTML 中显示,用户看不到它是一个独立的文件。
那我能不能把所有图片都用内嵌方式,这样邮件看起来更美观?
teacher
理论上可以,但不推荐。内嵌图片会增加邮件体积,如果图片太多或太大,邮件可能被服务器拒收(很多邮箱限制单封邮件不超过 25MB)。更好的做法是:Logo、小图标用内嵌,大图、产品图用外链(放在 CDN 上,HTML 中用普通的 img 标签引用)。
2.5. 本章小结与核心代码速查 在这一章中,我们完成了从 “零” 到 “能用” 的跨越,掌握了 Spring Boot 邮件发送的四种核心场景。
核心知识回顾
我们在本章解决了以下问题:
如何配置 SMTP 服务器并获取授权码 如何发送纯文本、HTML、附件、内嵌图片四种类型的邮件 如何使用 Thymeleaf 模板引擎动态生成邮件内容 如何排查 535 认证失败、连接超时、发件人不一致等常见错误 四种邮件场景速查表
场景 使用类 关键方法 适用业务 纯文本邮件 SimpleMailMessage setText() 验证码、简单通知 HTML 邮件 MimeMessageHelper setText(content, true) 订单确认、营销邮件 附件邮件 MimeMessageHelper addAttachment() 合同、发票、报表 内嵌图片 MimeMessageHelper addInline() 带 Logo 的邮件
场景一:发送验证码(纯文本)
1
2
3
4
5
6
7
8
public void sendVerificationCode (String to, String code) { SimpleMailMessage message = new SimpleMailMessage (); message.setFrom("你的邮箱@qq.com" ); message.setTo(to); message.setSubject("验证码" ); message.setText("您的验证码是:" + code + ",5分钟内有效。" ); mailSender.send(message); }
场景二:发送订单通知(HTML + 模板)
1
2
3
4
5
6
7
8
9
10
11
12
13
14
15
16
17
18
public void sendOrderNotification (String to, Map<String, Object> orderData) { try { Context context = new Context (); context.setVariables(orderData); String htmlContent = templateEngine.process("order-template" , context); MimeMessage mimeMessage = mailSender.createMimeMessage(); MimeMessageHelper helper = new MimeMessageHelper (mimeMessage, true , "UTF-8" ); helper.setFrom("你的邮箱@qq.com" ); helper.setTo(to); helper.setSubject("订单通知" ); helper.setText(htmlContent, true ); mailSender.send(mimeMessage); } catch (MessagingException e) { throw new RuntimeException ("邮件发送失败" , e); } }
场景三:发送月度报表(附件)
1
2
3
4
5
6
7
8
9
10
11
12
13
14
15
16
17
public void sendMonthlyReport (String to, String reportFilePath) { try { MimeMessage mimeMessage = mailSender.createMimeMessage(); MimeMessageHelper helper = new MimeMessageHelper (mimeMessage, true , "UTF-8" ); helper.setFrom("你的邮箱@qq.com" ); helper.setTo(to); helper.setSubject("月度报表" ); helper.setText("请查收本月报表。" ); File reportFile = new File (reportFilePath); helper.addAttachment(reportFile.getName(), new FileSystemResource (reportFile)); mailSender.send(mimeMessage); } catch (MessagingException e) { throw new RuntimeException ("邮件发送失败" , e); } }
场景四:发送营销邮件(HTML + 内嵌图片)
1
2
3
4
5
6
7
8
9
10
11
12
13
14
15
16
17
18
19
20
21
22
23
24
public void sendMarketingEmail (String to) { try { MimeMessage mimeMessage = mailSender.createMimeMessage(); MimeMessageHelper helper = new MimeMessageHelper (mimeMessage, true , "UTF-8" ); helper.setFrom("你的邮箱@qq.com" ); helper.setTo(to); helper.setSubject("新品上市通知" ); String htmlContent = "<html><body>" + "<img src='cid:banner' style='width:100%;' />" + "<h2>春季新品限时优惠</h2>" + "<p>全场8折,仅限本周!</p>" + "</body></html>" ; helper.setText(htmlContent, true ); ClassPathResource banner = new ClassPathResource ("static/images/banner.jpg" ); helper.addInline("banner" , banner); mailSender.send(mimeMessage); } catch (MessagingException e) { throw new RuntimeException ("邮件发送失败" , e); } }
常见错误速查表
错误代码 错误原因 解决方案 535 Authentication failed 密码错误或未使用授权码 检查是否使用授权码而非登录密码 501 Mail from address must be same 发件人与认证用户不一致 确保 setFrom 与配置文件 username 一致 Connection timed out 网络不通或端口被封 尝试切换端口(587 ↔ 465) 550 Mailbox not found 收件人邮箱不存在 检查收件人地址拼写 552 Message size exceeds 邮件体积超限 压缩附件或使用外链图片
配置文件模板(QQ 邮箱)
1
2
3
4
5
6
7
8
9
10
11
12
13
14
spring: mail: host: smtp.qq.com port: 587 username: 你的邮箱@qq.com password: 授权码(16位字符) properties: mail: smtp: auth: true starttls: enable: true required: true default-encoding: UTF-8
配置文件模板(使用 SSL 465 端口)
1
2
3
4
5
6
7
8
9
10
11
12
13
14
15
16
spring: mail: host: smtp.qq.com port: 465 username: 你的邮箱@qq.com password: 授权码 properties: mail: smtp: auth: true ssl: enable: true socketFactory: class: javax.net.ssl.SSLSocketFactory port: 465 default-encoding: UTF-8