Note 02. Bean 的注册与实例化:Spring 如何管理你的对象 摘要 :在上一章中,我们理解了 IoC 的设计思想和依赖注入的实现方式。但一个关键问题还没有回答:Spring 是如何知道要管理哪些对象的?又是如何创建这些对象的? 本章将深入探索 Bean 从 “配置” 到 “实例” 的完整旅程,剖析 XML、注解、JavaConfig 三种注册方式的演进历史,揭示组件扫描的工作原理,并对比多种实例化策略的设计意图。
本章学习路径
全景认知 :理解从配置文件到 Bean 实例的完整链路,认识 BeanDefinition 的桥梁作用。注册演进 :掌握 XML、注解、JavaConfig 三种注册方式的历史背景与适用场景。扫描机制 :深入理解 @ComponentScan 的工作原理与多模块项目中的边界问题。实例化策略 :了解 Spring 创建对象的多种方式及其设计考量。实践辨析 :彻底搞清 @Bean 与 @Component 的本质区别。2.1. 从配置到对象:Spring 创建 Bean 的完整链路 在开始学习具体的注册方式之前,我们需要先建立一个全局视角:当我们写下一个 @Component 注解或一个 <bean> 标签时,Spring 内部到底发生了什么?
2.1.1. 全景视角:配置 → BeanDefinition → 实例化 → 初始化 Spring 创建和管理 Bean 的过程可以分为四个关键阶段:
阶段一:配置
开发者通过某种方式告诉 Spring:“这个类需要被你管理”。这种方式可以是:
在类上添加 @Component、@Service、@Repository 等注解 在配置类中使用 @Bean 方法 在 XML 文件中编写 <bean> 标签 阶段二:解析注册
Spring 容器启动时,会扫描和解析这些配置,将它们转换为统一的内部表示——BeanDefinition 。这个过程就像是把各种格式的 “申请表”(XML、注解、JavaConfig)统一录入到一个 “数据库” 中。
阶段三:实例化
当需要使用某个 Bean 时(或容器启动时预加载),Spring 根据 BeanDefinition 中记录的信息,通过反射或工厂方法创建对象实例。此时对象已经存在于内存中,但还是一个 “毛坯”——属性都是默认值。
阶段四:初始化
Spring 对 “毛坯” 对象进行精装修:注入依赖、调用初始化回调方法、应用 AOP 代理等。完成后,Bean 才真正可用。
2.1.2. BeanDefinition:Bean 的 “出生证明” 在上述流程中,BeanDefinition 扮演着至关重要的角色。它是 Spring 内部用来描述一个 Bean 的元数据对象,记录了创建这个 Bean 所需的所有信息。
BeanDefinition 包含的核心信息
属性 说明 示例值 beanClassNameBean 的全限定类名 com.example.service.OrderServicescope作用域 singleton、prototypelazyInit是否延迟加载 true、falsedependsOn依赖的其他 Bean ["dataSource", "transactionManager"]autowireMode自动装配模式 byType、byName、constructorinitMethodName初始化方法名 initdestroyMethodName销毁方法名 cleanupconstructorArgumentValues构造器参数 参数值列表 propertyValues属性值 属性名-值映射 factoryBeanName工厂 Bean 名称 orderServiceFactoryfactoryMethodName工厂方法名 createOrderService
一个形象的比喻
如果把 Spring 容器比作一个 “婴儿医院”,那么:
配置文件/注解 :就像是父母填写的 “出生登记申请表”,格式各异(有的用表格,有的用手写)BeanDefinition :就像是医院统一的 “出生证明”,不管申请表是什么格式,最终都会转换成标准的出生证明Bean 实例 :就是根据出生证明信息 “生产” 出来的婴儿
2.1.3. 为什么需要 BeanDefinition 这个中间层 初学者可能会问:为什么不直接从配置创建对象,而要多一个 BeanDefinition 的中间层?
这个设计体现了软件工程中的 关注点分离 原则,带来了几个重要好处:
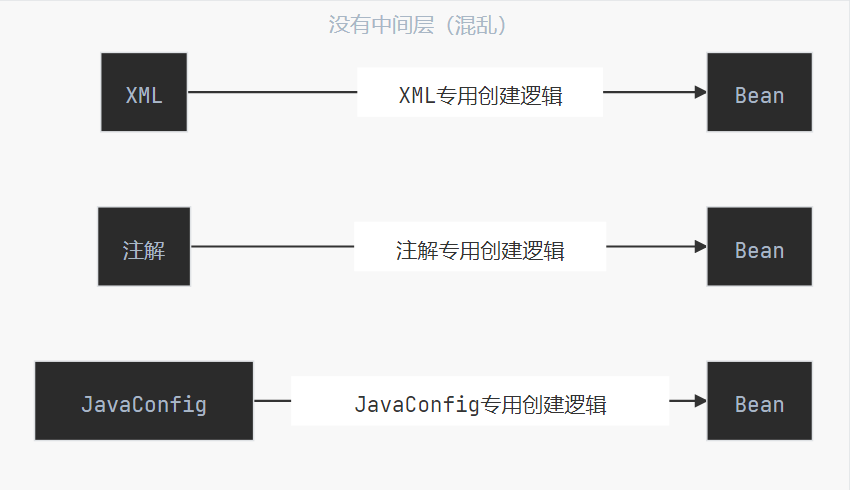
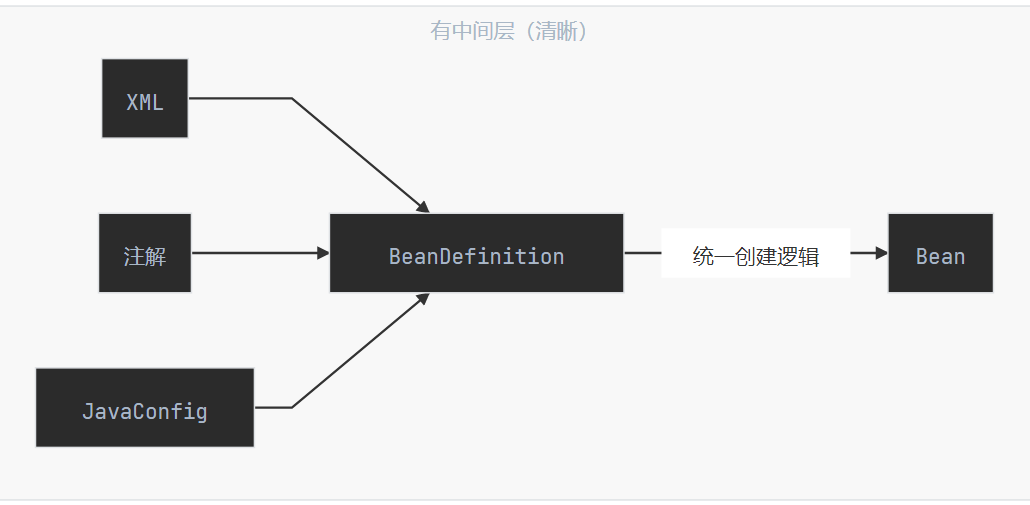
好处一:统一不同配置方式
Spring 支持 XML、注解、JavaConfig 等多种配置方式。如果没有 BeanDefinition,每种配置方式都需要自己实现一套创建 Bean 的逻辑,代码会非常混乱。有了 BeanDefinition 作为中间层,不同的配置方式只需要负责 “解析配置 → 生成 BeanDefinition”,而 “BeanDefinition → Bean 实例” 的逻辑是统一的。
好处二:支持延迟实例化
BeanDefinition 只是元数据,不占用太多内存。Spring 可以在启动时快速解析所有配置,生成 BeanDefinition,但不立即创建 Bean 实例。这样可以:
快速完成启动阶段的配置校验 支持按需创建(懒加载) 支持作用域管理(prototype 每次创建新实例) 好处三:支持动态修改
在 Bean 实例化之前,我们可以通过 BeanFactoryPostProcessor 修改 BeanDefinition。这为框架扩展提供了强大的能力:
1
2
3
4
5
6
7
8
9
10
11
12
13
14
15
@Component public class MyBeanFactoryPostProcessor implements BeanFactoryPostProcessor { @Override public void postProcessBeanFactory (ConfigurableListableBeanFactory beanFactory) { BeanDefinition bd = beanFactory.getBeanDefinition("orderService" ); bd.setScope("prototype" ); bd.setLazyInit(true ); } }
好处四:支持 Bean 定义的继承
BeanDefinition 支持父子关系,子定义可以继承父定义的配置:
1 2 3 4 5 6 7 8 9 10 11 12 13 14 <bean id ="baseService" abstract ="true" > <property name ="timeout" value ="30000" /> <property name ="retryCount" value ="3" /> </bean > <bean id ="orderService" class ="com.example.OrderService" parent ="baseService" > <property name ="orderRepository" ref ="orderRepository" /> </bean > <bean id ="userService" class ="com.example.UserService" parent ="baseService" > <property name ="userRepository" ref ="userRepository" /> </bean >
2.2. Bean 注册的三种范式演进 了解了 Bean 创建的全景链路后,我们来深入学习 “阶段一:配置” 的具体方式。Spring 的配置方式经历了从 XML 到注解再到 JavaConfig 的演进,每种方式都有其历史背景和适用场景。
2.2.1. XML 配置:显式声明的时代 历史背景
XML 配置是 Spring 最早支持的配置方式,从 Spring 1.0(2004 年)就开始使用。在那个年代:
Java 5 还没有普及,注解(Annotation)还是新鲜事物 “配置与代码分离” 被认为是最佳实践 XML 作为 “通用数据交换格式” 非常流行 基本语法
1
2
3
4
5
6
7
8
9
10
11
12
13
14
15
16
17
18
19
20
21
22
23
24
25
26
27
28
29
30
31
<?xml version="1.0" encoding="UTF-8" ?> <beans xmlns ="http://www.springframework.org/schema/beans" xmlns:xsi ="http://www.w3.org/2001/XMLSchema-instance" xsi:schemaLocation ="http://www.springframework.org/schema/beans http://www.springframework.org/schema/beans/spring-beans.xsd" > <bean id ="userRepository" class ="com.example.repository.UserRepository" /> <bean id ="userService" class ="com.example.service.UserService" > <property name ="userRepository" ref ="userRepository" /> <property name ="maxRetryCount" value ="3" /> </bean > <bean id ="orderService" class ="com.example.service.OrderService" > <constructor-arg ref ="userService" /> <constructor-arg value ="100" /> </bean > <bean id ="connectionPool" class ="com.example.pool.ConnectionPool" scope ="singleton" init-method ="init" destroy-method ="close" > <property name ="maxSize" value ="10" /> </bean > </beans >
XML 配置的核心元素解析
元素/属性 作用 示例 <bean>定义一个 Bean <bean id="xxx" class="xxx"/>idBean 的唯一标识 id="userService"classBean 的全限定类名 class="com.example.UserService"<property>Setter 注入 <property name="xxx" value="xxx"/><constructor-arg>构造器注入 <constructor-arg ref="xxx"/>ref引用另一个 Bean ref="userRepository"value注入字面量值 value="100"scope作用域 scope="prototype"init-method初始化回调方法 init-method="init"destroy-method销毁回调方法 destroy-method="close"
加载 XML 配置的方式
1 2 3 4 5 6 7 8 9 10 11 12 ApplicationContext context = new ClassPathXmlApplicationContext ("beans.xml" );ApplicationContext context = new FileSystemXmlApplicationContext ("/path/to/beans.xml" );ApplicationContext context = new ClassPathXmlApplicationContext ( "beans.xml" , "services.xml" , "repositories.xml" );
XML 配置的优缺点
优点 缺点 配置与代码完全分离 冗长繁琐,大量样板代码 修改配置无需重新编译 类型不安全,拼写错误只能运行时发现 集中管理所有 Bean IDE 支持有限,重构困难 适合需要动态切换配置的场景 配置文件与代码分离,理解成本高
现代开发中的定位
在 Spring Boot 时代,XML 配置已经很少使用。但在以下场景中,它仍然有价值:
遗留项目维护 :很多老项目仍在使用 XML 配置第三方库集成 :某些库只提供 XML 配置方式需要运行时动态切换配置 :XML 文件可以在不重新编译的情况下修改理解 Spring 原理 :XML 配置最直观地展示了 Spring 的配置模型2.2.2. 注解配置:@Component 家族与组件扫描 历史背景
随着 Java 5 引入注解特性,Spring 2.5(2007 年)开始支持注解配置。这是一个重大的范式转变:
配置从 “外部 XML 文件” 转移到 “代码本身” 遵循 “约定优于配置” 的理念 大大减少了样板代码 @Component 家族
Spring 提供了一组用于标记组件的注解,它们在功能上是等价的,但语义上有所区分:
1 2 3 4 5 6 7 8 9 10 11 12 13 14 15 16 17 18 19 20 21 22 23 24 25 26 27 28 29 30 31 @Component public class EmailValidator { public boolean validate (String email) { return email != null && email.contains("@" ); } } @Service public class UserService { } @Repository public class UserRepository { } @Controller public class UserController { } @RestController public class UserApiController { }
@Component 家族的关系
1
2
3
4
5
6
7
8
9
10
11
12
13
14
15
16
17
18
19
20
21
22
23
24
25
26
27
28
29
30
31
32
classDiagram class Component { <<annotation>> 通用组件标记 } class Service { <<annotation>> 业务逻辑层 } class Repository { <<annotation>> 数据访问层 自动转换数据访问异常 } class Controller { <<annotation>> Web 控制器 } class RestController { <<annotation>> REST API 控制器 = Controller + ResponseBody } Component <|-- Service : 派生 Component <|-- Repository : 派生 Component <|-- Controller : 派生 Controller <|-- RestController : 组合
为什么要区分这些注解?
虽然 @Service、@Repository、@Controller 在功能上与 @Component 完全相同(都是标记一个类为 Spring Bean),但区分它们有几个好处:
语义清晰 :一眼就能看出这个类属于哪一层AOP 切点 :可以针对特定注解定义切面(如只对 @Repository 做异常转换)未来扩展 :Spring 可能为不同注解添加特定功能(@Repository 已经有了异常转换功能)@Repository 的特殊能力
@Repository 不仅仅是语义标记,它还有一个实际功能:自动转换数据访问异常 。
1
2
3
4
5
6
7
8
9
10
11
12
13
14
15
16
@Repository public class UserRepository { @Autowired private JdbcTemplate jdbcTemplate; public User findById (Long id) { return jdbcTemplate.queryForObject( "SELECT * FROM users WHERE id = ?" , new UserRowMapper (), id ); } }
依赖注入注解
除了组件标记注解,还需要配合依赖注入注解使用:
1
2
3
4
5
6
7
8
9
10
11
12
13
14
15
16
17
18
19
20
21
22
23
@Service public class OrderService { @Autowired private OrderRepository orderRepository; private final UserService userService; @Autowired public OrderService (UserService userService) { this .userService = userService; } private NotificationService notificationService; @Autowired public void setNotificationService (NotificationService notificationService) { this .notificationService = notificationService; } }
@Autowired vs @Resource vs @Inject
Spring 支持多种依赖注入注解,它们有细微差别:
注解 来源 默认查找方式 指定名称 @AutowiredSpring 按类型(byType) 配合 @Qualifier @ResourceJSR-250(Java 标准) 按名称(byName) @Resource(name="xxx")@InjectJSR-330(Java 标准) 按类型(byType) 配合 @Named
推荐做法 :统一使用 @Autowired,它是 Spring 原生注解,功能最完整,IDE 支持最好。
注解配置的优缺点
优点 缺点 代码简洁,减少样板代码 配置分散在各个类中 类型安全,编译时检查 修改配置需要重新编译 IDE 支持好,重构方便 对第三方类无能为力(无法修改源码加注解) 符合 “就近原则”,配置与代码在一起 过度使用会导致 “注解地狱”
2.2.3. JavaConfig:@Configuration + @Bean 的类型安全方案 历史背景
JavaConfig 最早是一个独立项目,在 Spring 3.0(2009 年)被合并到核心框架中。它的出现是为了解决注解配置的一个痛点:如何将第三方库的类注册为 Bean?
对于我们自己写的类,可以加 @Component 注解。但对于第三方库的类(如 HikariDataSource、RedisTemplate),我们无法修改其源码,就无法使用注解配置。
基本语法
1
2
3
4
5
6
7
8
9
10
11
12
13
14
15
16
17
18
19
20
21
22
23
24
25
26
27
28
29
30
31
32
33
34
@Configuration public class AppConfig { @Bean public DataSource dataSource () { HikariDataSource ds = new HikariDataSource (); ds.setJdbcUrl("jdbc:mysql://localhost:3306/mydb" ); ds.setUsername("root" ); ds.setPassword("password" ); ds.setMaximumPoolSize(10 ); return ds; } @Bean public JdbcTemplate jdbcTemplate (DataSource dataSource) { return new JdbcTemplate (dataSource); } @Bean(name = "orderRepo", initMethod = "init", destroyMethod = "cleanup") public OrderRepository orderRepository (JdbcTemplate jdbcTemplate) { return new OrderRepository (jdbcTemplate); } @Bean @Scope("prototype") public OrderProcessor orderProcessor () { return new OrderProcessor (); } }
@Configuration 的特殊之处
@Configuration 不仅仅是 @Component 的变体,它有一个重要的特殊行为:保证 @Bean 方法的单例语义 。
1
2
3
4
5
6
7
8
9
10
11
12
13
14
15
16
17
18
19
20
21
@Configuration public class AppConfig { @Bean public DataSource dataSource () { System.out.println("Creating DataSource..." ); return new HikariDataSource (); } @Bean public JdbcTemplate jdbcTemplate () { return new JdbcTemplate (dataSource()); } @Bean public TransactionManager transactionManager () { return new DataSourceTransactionManager (dataSource()); } }
直觉上,dataSource() 方法被调用了两次,应该创建两个 DataSource 实例。但实际上,控制台只会打印一次 “Creating DataSource…”,因为 Spring 对 @Configuration 类做了特殊处理:
Spring 会为 @Configuration 类创建一个 CGLIB 代理 当 @Bean 方法被调用时,代理会先检查容器中是否已存在该 Bean 如果存在,直接返回容器中的实例;如果不存在,才真正执行方法创建新实例 @Configuration vs @Component
如果把 @Configuration 换成 @Component,行为会完全不同:
1
2
3
4
5
6
7
8
9
10
11
12
13
14
15
16
17
18
19
@Component public class AppConfig { @Bean public DataSource dataSource () { System.out.println("Creating DataSource..." ); return new HikariDataSource (); } @Bean public JdbcTemplate jdbcTemplate () { return new JdbcTemplate (dataSource()); } @Bean public TransactionManager transactionManager () { return new DataSourceTransactionManager (dataSource()); } }
使用 @Component 时,dataSource() 就是一个普通的 Java 方法调用,每次调用都会创建新实例。这通常不是我们想要的行为。
结论 :定义 @Bean 方法的类,应该使用 @Configuration 而不是 @Component。
JavaConfig 的优缺点
优点 缺点 类型安全,编译时检查 比注解配置稍显繁琐 可以配置第三方库的类 配置逻辑与业务代码混在 Java 文件中 支持复杂的条件逻辑 需要理解 @Configuration 的代理机制 IDE 支持完善,重构友好 - 可以利用 Java 语言的全部能力 -
2.2.4. 三种方式的混合使用与优先级 在实际项目中,三种配置方式往往是混合使用的。理解它们的适用场景和优先级规则非常重要。
各方式的适用场景
配置方式 最佳适用场景 @Component 注解 自己编写的业务组件(Service、Repository、Controller) @Bean 方法 第三方库的类、需要复杂初始化逻辑的 Bean XML 配置 遗留项目、需要运行时动态切换的配置
混合使用示例
1 2 3 4 5 6 7 8 9 10 11 12 13 14 15 16 17 18 19 20 21 22 23 24 25 26 27 28 29 30 31 32 33 34 @Service public class OrderService { } @Repository public class OrderRepository { } @Configuration public class DataSourceConfig { @Bean public DataSource dataSource () { return new HikariDataSource (); } @Bean public RedisTemplate<String, Object> redisTemplate (RedisConnectionFactory factory) { RedisTemplate<String, Object> template = new RedisTemplate <>(); template.setConnectionFactory(factory); return template; } } @Configuration @ImportResource("classpath:legacy-beans.xml") public class LegacyConfig { }
Bean 覆盖规则
当同一个 Bean 被多种方式定义时,Spring 有明确的优先级规则:
1 @Bean 方法 > @Component 注解 > XML 配置
更准确地说,后加载的 Bean 定义会覆盖先加载的 。默认的加载顺序是:
XML 配置(如果有) @Component 扫描 @Bean 方法 注意 :Spring Boot 2.1+ 默认禁止 Bean 覆盖,如果检测到重复定义会直接报错。可以通过配置开启:
1
2
3
spring: main: allow-bean-definition-overriding: true
2.3. 组件扫描深度解析:Spring 如何 “发现” Bean 在上一节中,我们学习了使用 @Component 家族注解来标记 Bean。但仅仅在类上加注解是不够的——Spring 还需要知道去哪里 “找” 这些被标记的类。这就是 组件扫描(Component Scanning) 的工作。
2.3.1. @ComponentScan 的工作原理 组件扫描的本质
组件扫描是 Spring 在启动时执行的一个过程:
扫描指定包(及其子包)下的所有类 检查每个类是否带有 @Component 或其派生注解 如果有,将其注册为 BeanDefinition 基本用法
1
2
3
4
5
6
7
8
9
10
11
12
13
14
15
16
@Configuration @ComponentScan("com.example") public class AppConfig {} @Configuration @ComponentScan({"com.example.service", "com.example.repository"}) public class AppConfig {} @Configuration @ComponentScan(basePackages = {"com.example.service", "com.example.repository"}) public class AppConfig {}
类型安全的包指定方式
直接写包名字符串有一个问题:如果包名拼写错误,编译器不会报错,只有运行时才会发现 Bean 没有被扫描到。
Spring 提供了一种类型安全的替代方案:
1
2
3
4
@Configuration @ComponentScan(basePackageClasses = {UserService.class, OrderRepository.class}) public class AppConfig {}
basePackageClasses 指定的是类,Spring 会扫描这些类所在的包。这样做的好处是:
如果类名拼写错误,编译器会报错 IDE 的重构功能可以正确处理包名变更 @SpringBootApplication 中的隐式扫描
在 Spring Boot 应用中,我们通常不需要显式配置 @ComponentScan,因为 @SpringBootApplication 已经包含了它:
1 2 3 4 5 6 7 8 9 10 @SpringBootConfiguration @EnableAutoConfiguration @ComponentScan(excludeFilters = { @Filter(type = FilterType.CUSTOM, classes = TypeExcludeFilter.class), @Filter(type = FilterType.CUSTOM, classes = AutoConfigurationExcludeFilter.class) }) public @interface SpringBootApplication { }
关键点 :@SpringBootApplication 会扫描 启动类所在的包及其子包 。这就是为什么 Spring Boot 项目的启动类通常放在根包下:
1
2
3
4
5
6
7
8
com.example.myapp ├── MyApplication.java // 启动类放在根包 ├── controller │ └── UserController.java // ✅ 会被扫描到 ├── service │ └── UserService.java // ✅ 会被扫描到 └── repository └── UserRepository.java // ✅ 会被扫描到
如果启动类放在子包中,其他包的组件就不会被扫描到:
1
2
3
4
5
6
7
com.example.myapp ├── app │ └── MyApplication.java // 启动类在子包中 ├── controller │ └── UserController.java // ❌ 不会被扫描到! └── service └── UserService.java // ❌ 不会被扫描到!
2.3.2. 扫描路径的默认规则与自定义配置 默认规则
当使用 @ComponentScan 不指定任何参数时,Spring 会扫描 配置类所在的包及其子包 :
1
2
3
4
5
6
package com.example.config;@Configuration @ComponentScan public class AppConfig {}
自定义扫描路径的几种方式
1 2 3 4 5 6 7 8 9 10 11 12 13 14 15 16 17 @ComponentScan("com.example.service") @ComponentScan({"com.example.service", "com.example.repository"}) @ComponentScan(basePackages = {"com.example.service", "com.example.repository"}) @ComponentScan(basePackageClasses = {UserService.class, OrderRepository.class}) @SpringBootApplication @ComponentScan({"com.example.myapp", "com.thirdparty.components"}) public class MyApplication {}
2.3.3. 过滤器机制:includeFilters 与 excludeFilters 有时候,我们需要更精细地控制哪些类应该被扫描、哪些应该被排除。Spring 提供了过滤器机制来实现这一点。
排除特定组件
1
2
3
4
5
6
7
8
9
10
11
12
13
14
15
16
17
18
19
@Configuration @ComponentScan( basePackages = "com.example", excludeFilters = { // 排除特定注解标记的类 @ComponentScan.Filter(type = FilterType.ANNOTATION, classes = Deprecated.class), // 排除特定的类 @ComponentScan.Filter(type = FilterType.ASSIGNABLE_TYPE, classes = LegacyService.class), // 排除匹配正则表达式的类 @ComponentScan.Filter(type = FilterType.REGEX, pattern = ".*Test.*"), // 排除匹配 AspectJ 表达式的类 @ComponentScan.Filter(type = FilterType.ASPECTJ, pattern = "com.example..*Mock*") } ) public class AppConfig {}
包含特定组件(即使没有 @Component 注解)
1
2
3
4
5
6
7
8
9
10
11
12
@Configuration @ComponentScan( basePackages = "com.example", includeFilters = { // 包含带有自定义注解的类 @ComponentScan.Filter(type = FilterType.ANNOTATION, classes = MyCustomAnnotation.class) }, // 注意:使用 includeFilters 时,通常需要禁用默认过滤器 useDefaultFilters = false ) public class AppConfig {}
FilterType 的五种类型
FilterType 说明 示例 ANNOTATION按注解过滤 排除所有 @Deprecated 标记的类 ASSIGNABLE_TYPE按类型过滤 排除特定类或其子类 ASPECTJ按 AspectJ 表达式过滤 com.example..*ServiceREGEX按正则表达式过滤 .*Test.*CUSTOM自定义过滤器 实现 TypeFilter 接口
自定义过滤器示例
1 2 3 4 5 6 7 8 9 10 11 12 13 14 15 16 17 18 19 20 21 22 23 public class ImplSuffixFilter implements TypeFilter { @Override public boolean match (MetadataReader metadataReader, MetadataReaderFactory metadataReaderFactory) { String className = metadataReader.getClassMetadata().getClassName(); return className.endsWith("Impl" ); } } @Configuration @ComponentScan( basePackages = "com.example", includeFilters = @ComponentScan.Filter( type = FilterType.CUSTOM, classes = ImplSuffixFilter.class ), useDefaultFilters = false ) public class AppConfig {}
2.3.4. 多模块项目中的扫描边界问题 在大型项目中,代码通常会被拆分成多个 Maven/Gradle 模块。这时候,组件扫描会遇到一个关键问题:启动类只能扫描到自己所在包及其子包,其他模块的 Bean 怎么办?
问题场景
1
2
3
4
5
6
7
8
9
10
11
12
13
14
15
16
17
my-project/ ├── my-app-web/ # Web 模块(启动类在这里) │ └── src/main/java/ │ └── com/example/web/ │ ├── MyApplication.java ← 启动类在 com.example.web │ └── controller/ │ └── UserController.java │ ├── my-app-service/ # 业务逻辑模块 │ └── src/main/java/ │ └── com/example/service/ ← 不在 com.example.web 下! │ └── UserService.java │ └── my-app-repository/ # 数据访问模块 └── src/main/java/ └── com/example/repository/ ← 不在 com.example.web 下! └── UserRepository.java
启动类 MyApplication 在 com.example.web 包下,默认只扫描 com.example.web 及其子包。结果:
✅ UserController 会被扫描到 ❌ UserService 不会被扫描到 ❌ UserRepository 不会被扫描到 启动时会报错:找不到 UserService 这个 Bean。
解决方案一:调整包结构(推荐)
最简单的方案是 让所有模块共享同一个根包 ,启动类放在根包下:
1
2
3
4
5
6
7
8
9
10
11
12
13
14
my-project/ ├── my-app-web/ │ └── com/example/ ← 根包 │ ├── MyApplication.java ← 启动类放在根包 │ └── web/ │ └── controller/ │ ├── my-app-service/ │ └── com/example/ ← 同一个根包 │ └── service/ │ └── my-app-repository/ └── com/example/ ← 同一个根包 └── repository/
现在启动类在 com.example,所有模块都在 com.example 的子包下,默认扫描就能覆盖全部。
这是最简单的方案 ,因为它不需要任何额外配置,符合 Spring Boot 的约定。
解决方案二:显式指定扫描路径
如果无法调整包结构(比如历史原因),可以显式告诉 Spring 要扫描哪些包:
1
2
3
4
5
6
7
8
9
10
11
@SpringBootApplication @ComponentScan({ "com.example.web", "com.example.service", "com.example.repository" }) public class MyApplication { public static void main (String[] args) { SpringApplication.run(MyApplication.class, args); } }
缺点 :每新增一个模块,都要记得来这里加一行。容易遗漏。
解决方案三:每个模块提供自己的配置类
让每个模块 “自己管自己”,主模块只需要导入:
1 2 3 4 5 6 7 8 9 10 11 12 13 14 15 16 17 18 19 20 21 22 23 @Configuration @ComponentScan("com.example.service") public class ServiceModuleConfig {} @Configuration @ComponentScan("com.example.repository") public class RepositoryModuleConfig {} @SpringBootApplication @Import({ ServiceModuleConfig.class, RepositoryModuleConfig.class }) public class MyApplication { public static void main (String[] args) { SpringApplication.run(MyApplication.class, args); } }
优点 :每个模块负责自己的扫描配置,职责清晰。
缺点 :主模块还是要知道有哪些模块配置类,新增模块时要改主模块代码。
解决方案四:利用自动配置机制(最优雅)
Spring Boot 提供了一种 “零侵入” 的方式:让模块自动注册自己的配置,主模块完全不用改代码 。
步骤一 :在子模块中创建配置类
1 2 3 4 5 @Configuration @ComponentScan("com.example.service") public class ServiceModuleAutoConfiguration {}
步骤二 :在子模块的 resources 目录下创建声明文件
1
2
3
4
5
my-app-service/ └── src/main/resources/ └── META-INF/ └── spring/ └── org.springframework.boot.autoconfigure.AutoConfiguration.imports
文件内容(就一行,写配置类的全限定名):
1 com.example.service.ServiceModuleAutoConfiguration
步骤三 :主模块什么都不用做
1
2
3
4
5
6
@SpringBootApplication public class MyApplication { public static void main (String[] args) { SpringApplication.run(MyApplication.class, args); } }
只要 my-app-web 模块依赖了 my-app-service 模块(在 pom.xml 中),Spring Boot 启动时会自动发现并加载 ServiceModuleAutoConfiguration。
原理 :Spring Boot 启动时会扫描所有 jar 包中的 META-INF/spring/org.springframework.boot.autoconfigure.AutoConfiguration.imports 文件,自动加载里面声明的配置类。这和 Spring Boot 自己的自动配置机制是一样的。
四种方案对比
方案 改动位置 新增模块时 推荐场景 调整包结构 所有模块 无需改动 新项目,能统一包结构 @ComponentScan 指定路径 主模块 要改主模块 临时方案,模块少 @Import 导入配置类 主模块 + 子模块 要改主模块 模块间有明确依赖关系 自动配置机制 子模块 无需改主模块 模块独立,追求解耦
总结
新项目 :优先采用方案一,统一包结构,省心省力已有项目无法改包结构 :采用方案四,利用自动配置机制,最优雅简单场景 :方案二或方案三都可以,看个人喜好2.4. Bean 的实例化策略:Spring 如何 “创建” 对象 了解了 Bean 的注册方式后,我们来看一个更底层的问题:Spring 拿到 BeanDefinition 之后,具体是怎么把对象 “变” 出来的?
在日常开发中,我们创建对象最常用的方式就是 new:
1 UserService userService = new UserService ();
但 Spring 作为一个通用框架,需要应对各种各样的对象创建场景。有些对象可以直接 new,有些对象的创建过程很复杂,有些对象甚至不能直接 new(比如第三方库的类)。因此,Spring 提供了多种 实例化策略 。
2.4.1. 策略一:构造器实例化(最常用) 这是最直接、最常用的方式:Spring 通过 反射 调用类的构造器来创建对象。
工作原理
代码示例
在 Spring Boot 中,我们只需要给类加上 @Service、@Component 等注解,Spring 就会自动使用构造器来创建实例:
1
2
3
4
5
6
7
8
9
10
11
12
13
14
15
16
17
18
19
20
21
package com.example.demo.service;import com.example.demo.repository.OrderRepository;import org.springframework.stereotype.Service;@Service public class OrderService { private final OrderRepository orderRepository; public OrderService (OrderRepository orderRepository) { this .orderRepository = orderRepository; System.out.println("OrderService 被创建了,依赖的 OrderRepository: " + orderRepository); } public void createOrder (String productName) { orderRepository.save(productName); } }
1
2
3
4
5
6
7
8
9
10
11
12
13
14
15
package com.example.demo.repository;import org.springframework.stereotype.Repository;@Repository public class OrderRepository { public OrderRepository () { System.out.println("OrderRepository 被创建了" ); } public void save (String productName) { System.out.println("保存订单: " + productName); } }
启动应用后的输出
1
2
OrderRepository 被创建了 OrderService 被创建了,依赖的 OrderRepository: com.example.demo.repository.OrderRepository@1234abcd
可以看到,Spring 自动按照依赖顺序创建了对象:先创建 OrderRepository,再创建 OrderService。
多个构造器时的选择规则
如果一个类有多个构造器,Spring 会按以下规则选择:
1
2
3
4
5
6
7
8
9
10
11
12
13
14
15
16
17
18
19
20
21
22
23
24
25
26
@Service public class OrderService { private OrderRepository orderRepository; private NotificationService notificationService; public OrderService () { System.out.println("使用无参构造器" ); } public OrderService (OrderRepository orderRepository) { this .orderRepository = orderRepository; System.out.println("使用一参构造器" ); } @Autowired public OrderService (OrderRepository orderRepository, NotificationService notificationService) { this .orderRepository = orderRepository; this .notificationService = notificationService; System.out.println("使用两参构造器" ); } }
情况 Spring 的选择 只有一个构造器 使用它(不管有没有 @Autowired) 多个构造器,其中一个有 @Autowired 使用有 @Autowired 的那个 多个构造器,都没有 @Autowired 使用无参构造器 多个构造器,都没有 @Autowired,也没有无参构造器 报错
最佳实践 :一个类只写一个构造器,包含所有必需的依赖,这样最清晰,也不需要加 @Autowired。
2.4.2. 策略二:@Bean 工厂方法(配置第三方库必备) 构造器实例化有一个前提:你能修改这个类的源码 ,才能给它加 @Component 注解。
但如果是第三方库的类呢?比如 HikariDataSource(数据库连接池)、RestTemplate(HTTP 客户端)、ObjectMapper(JSON 处理器),这些类的源码我们无法修改,不能加注解。
这时候就需要用 @Bean 工厂方法 。
什么是工厂方法?
工厂方法就是一个 专门用来创建对象的方法 。你告诉 Spring:“当你需要某个 Bean 时,调用我这个方法,我来负责创建”。
代码示例:配置 RestTemplate
1
2
3
4
5
6
7
8
9
10
11
12
13
14
15
16
17
18
19
20
21
22
23
24
package com.example.demo.config;import org.springframework.context.annotation.Bean;import org.springframework.context.annotation.Configuration;import org.springframework.web.client.RestTemplate;@Configuration public class AppConfig { @Bean public RestTemplate restTemplate () { System.out.println("正在创建 RestTemplate..." ); RestTemplate template = new RestTemplate (); return template; } }
使用这个 Bean
1
2
3
4
5
6
7
8
9
10
11
12
13
14
15
16
17
18
19
20
package com.example.demo.service;import org.springframework.stereotype.Service;import org.springframework.web.client.RestTemplate;@Service public class WeatherService { private final RestTemplate restTemplate; public WeatherService (RestTemplate restTemplate) { this .restTemplate = restTemplate; } public String getWeather (String city) { String url = "https://api.weather.com/v1/weather?city=" + city; return restTemplate.getForObject(url, String.class); } }
更复杂的例子:配置数据源
1
2
3
4
5
6
7
8
9
10
11
12
13
14
15
16
17
18
19
20
21
22
23
24
25
26
27
28
29
30
31
32
33
34
35
36
37
38
39
40
41
42
43
44
package com.example.demo.config;import com.zaxxer.hikari.HikariDataSource;import org.springframework.beans.factory.annotation.Value;import org.springframework.context.annotation.Bean;import org.springframework.context.annotation.Configuration;import javax.sql.DataSource;@Configuration public class DataSourceConfig { @Value("${spring.datasource.url}") private String url; @Value("${spring.datasource.username}") private String username; @Value("${spring.datasource.password}") private String password; @Bean public DataSource dataSource () { System.out.println("正在创建数据源..." ); HikariDataSource ds = new HikariDataSource (); ds.setJdbcUrl(url); ds.setUsername(username); ds.setPassword(password); ds.setMaximumPoolSize(10 ); ds.setMinimumIdle(5 ); ds.setConnectionTimeout(30000 ); ds.setIdleTimeout(600000 ); ds.setMaxLifetime(1800000 ); System.out.println("数据源创建完成,连接地址: " + url); return ds; } }
@Bean 方法可以有参数
如果你的工厂方法需要依赖其他 Bean,直接写成参数就行,Spring 会自动注入:
1
2
3
4
5
6
7
8
9
10
11
12
13
14
15
16
17
18
19
20
21
@Configuration public class AppConfig { @Bean public DataSource dataSource () { return new HikariDataSource (); } @Bean public JdbcTemplate jdbcTemplate (DataSource dataSource) { return new JdbcTemplate (dataSource); } @Bean public UserRepository userRepository (JdbcTemplate jdbcTemplate, DataSource dataSource) { return new UserRepository (jdbcTemplate); } }
2.4.3. 策略三:FactoryBean(高级场景) FactoryBean 是 Spring 提供的一个特殊接口,用于更复杂的对象创建场景。日常开发中很少需要自己写 FactoryBean ,但了解它有助于理解一些框架的工作原理(比如 MyBatis 的 Mapper 是怎么被创建的)。
FactoryBean 解决什么问题?
有些对象的创建过程非常复杂,或者需要创建的是 代理对象 而不是真实对象。这时候用普通的 @Bean 方法会显得很笨重,FactoryBean 提供了更优雅的封装。
一个简单的例子:理解 FactoryBean 的行为
1
2
3
4
5
6
7
8
9
10
11
12
13
14
15
16
17
18
19
20
21
22
23
24
25
26
27
28
29
30
31
32
33
34
35
36
package com.example.demo.factory;import org.springframework.beans.factory.FactoryBean;import org.springframework.stereotype.Component;import java.text.SimpleDateFormat;@Component("dateFormat") public class DateFormatFactoryBean implements FactoryBean <SimpleDateFormat> { private String pattern = "yyyy-MM-dd HH:mm:ss" ; @Override public SimpleDateFormat getObject () throws Exception { System.out.println("FactoryBean 正在创建 SimpleDateFormat,格式: " + pattern); return new SimpleDateFormat (pattern); } @Override public Class<?> getObjectType() { return SimpleDateFormat.class; } @Override public boolean isSingleton () { return true ; } public void setPattern (String pattern) { this .pattern = pattern; } }
FactoryBean 的特殊行为
1
2
3
4
5
6
7
8
9
10
11
12
13
14
15
16
17
18
19
20
21
22
23
24
25
26
27
package com.example.demo.service;import org.springframework.beans.factory.annotation.Autowired;import org.springframework.context.ApplicationContext;import org.springframework.stereotype.Service;import java.text.SimpleDateFormat;@Service public class DemoService { @Autowired private ApplicationContext context; public void demo () { SimpleDateFormat format = context.getBean("dateFormat" , SimpleDateFormat.class); System.out.println("获取到的对象类型: " + format.getClass().getName()); Object factory = context.getBean("&dateFormat" ); System.out.println("工厂对象类型: " + factory.getClass().getName()); } }
FactoryBean 在框架中的应用
你可能没有自己写过 FactoryBean,但你一定用过基于 FactoryBean 实现的功能:
框架 FactoryBean 作用 MyBatis MapperFactoryBean为 Mapper 接口创建代理实现 Spring Data JPA JpaRepositoryFactoryBean为 Repository 接口创建代理实现 Feign FeignClientFactoryBean为 Feign 客户端接口创建代理实现
这就是为什么你只需要写一个接口,不需要写实现类,框架就能帮你完成数据库操作或远程调用——背后都是 FactoryBean 在创建代理对象。
2.4.4. 三种策略的对比与选择 策略 适用场景 代码示例 构造器实例化 自己写的业务类 @Service public class OrderService {...}@Bean 工厂方法 第三方库的类、需要复杂配置的对象 @Bean public RestTemplate restTemplate() {...}FactoryBean 需要创建代理对象、框架级别的高级封装 一般不需要自己写,了解原理即可
总结
90% 的情况 :用 @Service、@Component 等注解,让 Spring 自动通过构造器创建配置第三方库 :用 @Bean 方法FactoryBean :了解原理即可,日常开发基本用不到2.5. @Bean 与 @Component 的本质区别 这是一个高频面试题,也是很多开发者容易混淆的地方。虽然 @Bean 和 @Component 都能将对象注册为 Spring Bean,但它们的工作机制和适用场景有本质区别。
2.5.1. 注册时机的差异:编译时 vs 运行时 @Component 的工作机制
@Component 是一个 类级别 的注解,Spring 在启动时通过 组件扫描 发现它:
1
2
3
4
5
@Component public class UserService { }
处理流程 :
Spring 启动,执行组件扫描 扫描器遍历指定包下的所有 .class 文件 读取每个类的注解元数据(不需要加载类) 发现 @Component(或其派生注解),创建 BeanDefinition 将 BeanDefinition 注册到容器 @Bean 的工作机制
@Bean 是一个 方法级别 的注解,Spring 通过 解析配置类 发现它:
1
2
3
4
5
6
7
8
9
10
@Configuration public class AppConfig { @Bean public UserService userService () { return new UserService (); } }
处理流程 :
Spring 启动,发现 @Configuration 类 解析配置类,找到所有 @Bean 方法 为每个 @Bean 方法创建 BeanDefinition BeanDefinition 记录:工厂 Bean = 配置类,工厂方法 = @Bean 方法 需要 Bean 时,调用配置类的 @Bean 方法获取实例 2.5.2. 控制粒度的差异:方法级 vs 类级 @Component:一个类 = 一个 Bean
使用 @Component 时,一个类只能产生一个 Bean(除非配合 @Scope("prototype")):
1
2
3
4
@Component public class EmailSender implements MessageSender { }
@Bean:一个方法 = 一个 Bean,灵活度更高
使用 @Bean 时,可以在一个配置类中定义多个同类型的 Bean:
1
2
3
4
5
6
7
8
9
10
11
12
13
14
15
16
17
18
19
20
@Configuration public class MessageSenderConfig { @Bean public MessageSender emailSender () { return new EmailSender ("smtp.example.com" ); } @Bean public MessageSender smsSender () { return new SmsSender ("api.sms.com" ); } @Bean public MessageSender pushSender () { return new PushSender ("push.example.com" ); } }
@Bean 可以对同一个类创建不同配置的实例
1
2
3
4
5
6
7
8
9
10
11
12
13
14
15
16
17
18
19
20
21
@Configuration public class DataSourceConfig { @Bean @Primary public DataSource primaryDataSource () { HikariDataSource ds = new HikariDataSource (); ds.setJdbcUrl("jdbc:mysql://master:3306/db" ); return ds; } @Bean public DataSource replicaDataSource () { HikariDataSource ds = new HikariDataSource (); ds.setJdbcUrl("jdbc:mysql://replica:3306/db" ); ds.setReadOnly(true ); return ds; } }
2.5.3. 适用场景对比:何时用 @Bean,何时用 @Component 使用 @Component 的场景
场景 说明 自己编写的业务类 Service、Repository、Controller 等 类的创建逻辑简单 只需要调用构造器,依赖通过 DI 注入 一个类只需要一个 Bean 不需要同一个类的多个实例
1 2 3 4 5 6 7 8 9 10 11 12 13 14 @Service public class OrderService { private final OrderRepository orderRepository; public OrderService (OrderRepository orderRepository) { this .orderRepository = orderRepository; } public void createOrder (OrderRequest request) { } }
使用 @Bean 的场景
场景 说明 第三方库的类 无法修改源码添加 @Component 需要复杂的初始化逻辑 多步骤配置、条件判断等 同一个类需要多个不同配置的实例 如主从数据源 需要根据条件返回不同的实现 工厂模式的应用 需要显式控制 Bean 的创建过程 如设置属性、调用初始化方法
1 2 3 4 5 6 7 8 9 10 11 12 13 14 15 16 17 18 19 20 21 22 23 24 25 26 27 28 29 30 31 32 33 34 35 36 37 38 @Configuration public class ThirdPartyConfig { @Bean public RestTemplate restTemplate () { RestTemplate template = new RestTemplate (); template.setRequestFactory(new HttpComponentsClientHttpRequestFactory ()); return template; } @Bean public DataSource dataSource (DataSourceProperties properties) { HikariDataSource ds = new HikariDataSource (); ds.setJdbcUrl(properties.getUrl()); ds.setUsername(properties.getUsername()); ds.setPassword(properties.getPassword()); ds.setMaximumPoolSize(properties.getMaxPoolSize()); ds.setMinimumIdle(properties.getMinIdle()); ds.setConnectionTimeout(properties.getConnectionTimeout()); return ds; } @Bean public MessageSender messageSender (@Value("${notification.type}") String type) { return switch (type) { case "email" -> new EmailSender (); case "sms" -> new SmsSender (); case "push" -> new PushNotificationSender (); default -> throw new IllegalArgumentException ("Unknown type: " + type); }; } }
混合使用的典型模式
在实际项目中,@Component 和 @Bean 通常是混合使用的:
1 2 3 4 5 6 7 8 9 10 11 12 13 14 15 16 17 18 19 20 21 22 23 24 25 26 27 28 29 30 31 32 33 34 35 36 37 38 39 40 41 42 43 44 45 46 47 48 49 50 51 52 53 @RestController @RequestMapping("/api/orders") public class OrderController { private final OrderService orderService; public OrderController (OrderService orderService) { this .orderService = orderService; } @PostMapping public Order createOrder (@RequestBody OrderRequest request) { return orderService.createOrder(request); } } @Service public class OrderService { private final OrderRepository orderRepository; private final RestTemplate restTemplate; public OrderService (OrderRepository orderRepository, RestTemplate restTemplate) { this .orderRepository = orderRepository; this .restTemplate = restTemplate; } } @Repository public class OrderRepository { } @Configuration public class InfrastructureConfig { @Bean public RestTemplate restTemplate () { return new RestTemplate (); } @Bean public ObjectMapper objectMapper () { ObjectMapper mapper = new ObjectMapper (); mapper.registerModule(new JavaTimeModule ()); mapper.disable(SerializationFeature.WRITE_DATES_AS_TIMESTAMPS); return mapper; } }
总结对比表
对比维度 @Component @Bean 注解位置 类上 方法上(在 @Configuration 类中) 发现机制 组件扫描 配置类解析 适用对象 自己编写的类 任何类(包括第三方库) 创建控制 自动(调用构造器) 手动(方法体中编写逻辑) 灵活度 较低(一个类一个 Bean) 较高(可创建多个不同配置的实例) 代码侵入性 需要修改类的源码 不需要修改目标类 依赖注入 构造器/字段/Setter 注入 方法参数注入
2.6. 本章总结与 Bean 注册决策流程图 摘要回顾
本章我们深入探索了 Spring Bean 从 “配置” 到 “实例” 的完整旅程。首先,我们建立了全景视角,理解了配置 → BeanDefinition → 实例化 → 初始化的四阶段流程,认识到 BeanDefinition 作为 “中间层” 的重要设计价值。
接着,我们学习了 Bean 注册的三种范式演进:
XML 配置 :Spring 早期的方式,显式声明,配置与代码分离注解配置 :@Component 家族,约定优于配置,代码简洁JavaConfig :@Configuration + @Bean,类型安全,适合第三方库我们深入剖析了 组件扫描 的工作原理,包括 @ComponentScan 的配置方式、过滤器机制,以及多模块项目中的边界问题和解决方案。
然后,我们探讨了 Spring 的多种 实例化策略 :构造器实例化、静态工厂方法、实例工厂方法和 FactoryBean,理解了每种策略的适用场景和设计意图。
最后,我们彻底搞清了 @Bean 与 @Component 的本质区别 :前者是方法级别的工厂方法,后者是类级别的组件标记;前者适合第三方库和复杂初始化,后者适合自己编写的业务类。
核心概念速查表 概念 定义 关键要点 BeanDefinition Bean 的元数据描述对象 记录了创建 Bean 所需的所有信息,是配置与实例之间的桥梁 组件扫描 Spring 自动发现 Bean 的机制 扫描指定包下带有 @Component 注解的类 @ComponentScan 配置组件扫描的注解 可指定包路径、过滤器等 @Configuration 标记配置类的注解 会被 CGLIB 代理,保证 @Bean 方法的单例语义 @Bean 标记工厂方法的注解 方法返回值注册为 Bean,适合第三方库 @Component 标记组件类的注解 类本身注册为 Bean,适合自己的业务类 FactoryBean 特殊的工厂 Bean 接口 getBean 返回的是 getObject() 的结果,而非 FactoryBean 本身
Bean 注册方式选择决策图 1 2 3 4 5 6 7 8 9 10 11 12 13 14 15 16 17 18 19 20 21 22 23 24 25 26 27 flowchart TD A["需要注册一个 Bean"] --> B{"是自己写的类吗?"} B -->|"是"| C{"是什么类型的组件?"} C -->|"业务逻辑层"| D["@Service"] C -->|"数据访问层"| E["@Repository"] C -->|"Web 控制器"| F["@Controller / @RestController"] C -->|"通用组件"| G["@Component"] B -->|"否(第三方库)"| H["使用 @Bean 方法"] H --> I{"创建逻辑复杂吗?"} I -->|"是"| J["在 @Bean 方法中编写完整逻辑"] I -->|"否"| K["简单的 @Bean 方法"] L["需要同一个类的多个实例?"] --> M["必须使用 @Bean"] N["需要根据条件返回不同实现?"] --> O["使用 @Bean + 条件逻辑"] style D fill:#c8e6c9 style E fill:#c8e6c9 style F fill:#c8e6c9 style G fill:#c8e6c9 style H fill:#fff9c4 style J fill:#fff9c4 style K fill:#fff9c4 style M fill:#fff9c4 style O fill:#fff9c4
组件扫描问题排查指南 问题现象 可能原因 解决方案 Bean 没有被扫描到 类不在扫描路径内 检查 @ComponentScan 配置,确保包路径正确 Bean 没有被扫描到 类没有添加 @Component 注解 添加 @Component 或其派生注解 Bean 没有被扫描到 被 excludeFilters 排除了 检查过滤器配置 多模块项目中 Bean 找不到 其他模块的包不在扫描范围内 扩展 @ComponentScan 或使用 @Import @Bean 方法没有生效 配置类没有被扫描到 确保配置类在扫描路径内,或使用 @Import 导入 @Bean 方法没有生效 配置类没有加 @Configuration 添加 @Configuration 注解 同类型 Bean 冲突 存在多个同类型的 Bean 使用 @Primary 或 @Qualifier 指定
实例化策略选择指南 场景 推荐策略 示例 普通业务类 构造器实例化 + @Component @Service public class OrderService {...}第三方库的类 @Bean 工厂方法 @Bean public RestTemplate restTemplate() {...}需要复杂初始化 @Bean 工厂方法 多步骤配置、条件判断 需要创建代理对象 FactoryBean MyBatis 的 MapperFactoryBean 同一个类多个实例 @Bean 工厂方法 主从数据源配置
本章核心心智模型 从配置到对象的完整链路
1 2 3 4 5 6 7 8 9 10 11 12 13 14 15 16 17 18 19 20 21 22 23 24 25 26 27 28 29 30 31 32 33 graph LR subgraph "阶段1: 配置" A1["@Component"] A2["@Bean"] A3["XML"] end subgraph "阶段2: 解析" B["BeanDefinition"] end subgraph "阶段3: 实例化" C1["构造器"] C2["工厂方法"] C3["FactoryBean"] end subgraph "阶段4: 初始化" D["完整的 Bean"] end A1 --> B A2 --> B A3 --> B B --> C1 B --> C2 B --> C3 C1 --> D C2 --> D C3 --> D style B fill:#fff3e0 style D fill:#c8e6c9
核心认知升级
读完本章,你应该建立起以下认知:
BeanDefinition 是关键的中间层 :它统一了不同配置方式,支持延迟实例化和动态修改三种配置方式各有适用场景 :@Component 适合自己的类,@Bean 适合第三方库,XML 适合遗留项目组件扫描有边界 :默认只扫描启动类所在包及其子包,多模块项目需要特别注意@Configuration 不只是 @Component :它有 CGLIB 代理,保证 @Bean 方法的单例语义@Bean 和 @Component 本质不同 :前者是工厂方法,后者是组件标记,选择取决于场景