Vue 生态(番外):Pinia · Vue 应用状态管理最佳实践

第一章:初识 Pinia · 让状态流动起来

摘要: 在本章中,我们将摒弃所有复杂的理论,以最直接、最快速的方式,让你亲手构建并见证 Pinia 的核心魔力。我们将从一个全新的 Vite 项目开始,为其配备专业工具,然后用最短的时间创建第一个 Store,并探索其 两种核心定义方式。随后我们将建立 工业级的目录规范,并最终解决组件消费状态时最关键的 响应性问题。这趟旅程将为你后续的深入学习建立最坚实的感性认知和强大的信心。


在本章中,我们将循序渐进,完成一次完整的 Pinia 初体验:

  1. 首先,我们将初始化一个全新的 Vite + TS 项目,并一次性集成后续所需的 核心依赖
  2. 接着,我们将创建并使用 第一个 Pinia Store,完成从安装、注册到组件消费的完整闭环。
  3. 然后,我们将深入学习 Store 的 三大核心要素——State, Getters, Actions,理解它们各自的职责。
  4. 之后,我们将探索 defineStore两种“风味”——选项式与组合式,拓宽我们的技术视野。
  5. 在动手之后,我们将回头 奠定架构基础,建立规范的目录与类型文件。
  6. 最后,我们将直面并解决新手最容易遇到的 响应式“陷阱”,并掌握 Pinia 提供的关键工具 storeToRefs

1.1. 专业起点:初始化 Pinia 实战项目

一个专业的“番外篇”也需要一个专业的起点。我们将从零开始,搭建一个包含所有必要工具的、干净的实战环境。

第一步:创建 Vite 项目

打开终端,运行 pnpm create vite 命令,并遵循引导创建一个名为 pinia-practiceVue + TypeScript 项目。

1
pnpm create vite pinia-practice --template vue-ts

第二步:进入项目并安装核心依赖

进入项目目录,然后我们将一次性安装本指南所需的全部核心依赖。

1
2
cd pinia-practice
pnpm install

架构师思维: 一个专业的项目会预见其未来的需求。我们现在一次性安装所有工具,正是为了后续章节在讲解时,能将 Pinia 与 VueUse、API Mock 等无缝结合,展示一个完整的生态协同。

1
2
3
4
5
6
7
8
9
10
11
# 安装 Pinia 核心
pnpm add pinia@2.1.7

# 安装 SCSS 预处理器
pnpm add -D sass

# 安装 VueUse 工具库
pnpm add @vueuse/core

# 安装 API Mock 工具
pnpm add -D json-server@0.17.4

第三步:在应用中注册 Pinia

我们需要在应用入口 main.ts 中创建 Pinia 实例并将其注册为 Vue 插件。这是让 Pinia 在整个应用中生效的关键一步。

文件路径: src/main.ts

1
2
3
4
5
6
7
8
9
10
11
import { createApp } from 'vue'
import { createPinia } from 'pinia' // 1. 导入 createPinia
import App from './App.vue'

// 2. 创建 Pinia 实例
const pinia = createPinia()
const app = createApp(App)

// 3. 将 Pinia 实例提供给应用
app.use(pinia)
app.mount('#app')

至此,我们的项目环境已准备就绪。


1.2. 初次接触:创建并使用第一个 Store

理论千遍,不如动手一遍。让我们用最快的速度,让一个全局计数器在应用中运转起来。

第一步:创建 Store 文件

按照约定,我们在 src 目录下创建一个 stores 文件夹,并在其中新建 counter.ts 文件。

文件路径: src/stores/counter.ts

1
2
3
4
5
6
7
8
9
10
11
12
13
14
15
16
17
import { defineStore } from 'pinia';

// defineStore 的第一个参数是 store 的唯一 id,在整个应用中必须唯一
export const useCounterStore = defineStore('counter', {
// state 是 store 的核心,用来存放数据
// 必须是一个函数,以避免在服务端渲染时产生交叉请求污染
state: () => ({
count: 0,
}),
// actions 用来封装业务逻辑,修改 state
actions: {
increment() {
// 在 action 中,`this` 指向当前的 store 实例
this.count++;
},
},
});

这个 useCounterStore 就是一个响应式的“钩子”,我们可以在任何组件中调用它来获取 Store 实例。

第二步:在组件中使用 Store

现在,我们清空 App.vue 的默认内容,让它来消费我们刚刚创建的 Store。

文件路径: src/App.vue

1
2
3
4
5
6
7
8
9
10
11
12
13
14
15
16
17
18
19
20
21
22
23
24
25
26
27
28
29
30
31
32
33
34
35
36
37
38
39
40
41
<script setup lang="ts">
import { useCounterStore } from './stores/counter';

// 在组件中调用 use...Store() 函数来获取 store 实例
const counterStore = useCounterStore();
</script>

<template>
<div class="card">
<h1>Hello, Pinia!</h1>
<p>
当前计数:
<strong>{{ counterStore.count }}</strong>
</p>
<button @click="counterStore.increment()">点我 +1</button>
</div>
</template>

<style lang="scss" scoped>
.card {
padding: 2rem;
text-align: center;
border: 1px solid #ddd;
border-radius: 8px;
max-width: 400px;
margin: 50px auto;
font-family: sans-serif;

strong {
font-size: 2em;
margin-left: 0.5em;
color: #42b883;
}

button {
margin-top: 1em;
padding: 0.5em 1em;
font-size: 1em;
}
}
</style>

现在,运行你的项目 (pnpm run dev)。当你点击按钮时,会看到页面上的数字实时增加。恭喜你!你已经成功地让一个全局状态在应用中流动了起来,这就是 Pinia 最核心的价值。


1.3. 核心三要素:State, Getters, Actions

在完成了“Hello World”之后,让我们回头仔细审视一下构成 Store 的三个核心部分。我们可以把一个 Store 想象成一个独立的、拥有自己 data, computed, methods 的“超级组件”。

  • State: 这是 Store 的 核心数据源,相当于组件的 data。它必须是一个返回对象的函数,以确保每个 Store 实例都拥有自己独立的状态副本。

  • Getters: 这是 Store 的 计算属性,相当于组件的 computed。它用于从 state 派生出新的值,并且其结果会被缓存,只有当其依赖的 state 发生变化时才会重新计算。

  • Actions: 这是 Store 的 方法,相当于组件的 methods。它是 修改 state 的唯一官方渠道actions 可以是同步的,也可以是异步的,所有复杂的业务逻辑都应该封装在 actions 内部。

现在,让我们为之前的 counter.ts 补充上 getters

文件路径: src/stores/counter.ts

1
2
3
4
5
6
7
8
9
10
11
12
13
14
15
16
17
18
19
20
21
22
23
import { defineStore } from 'pinia';

export const useCounterStore = defineStore('counter', {
state: () => ({
count: 0,
}),
// (新增) Getters
getters: {
// getter 会接收 state 作为第一个参数
doubleCount(state): number {
return state.count * 2;
},
// getter 内部也可以通过 `this` 访问其他 getter
doubleCountPlusOne(): number {
return this.doubleCount + 1;
},
},
actions: {
increment() {
this.count++;
},
},
});

在组件中,你可以像访问 state 一样直接访问 getters<p>双倍计数: {{ counterStore.doubleCount }}</p>


1.4. defineStore 的两种“风味”:选项式与组合式

在我们已经熟悉了上面这种选项风格的 Store 之后,是时候来了解 Pinia 提供的另一种更灵活、更强大的组合式写法了。

选项式 (Options Store),正如我们所见,它的结构与 Vue 的选项式 API 非常相似,通过 state, getters, actions 三个属性来组织,非常清晰,是我们推荐的入门首选。

组合式 (Setup Store),则完全对标 Vue 3 的 <script setup>。你在一个函数中定义 Store,可以使用 ref 定义响应式状态,用 computed 定义 getters,用 function 定义 actions。它提供了极高的灵活性,是处理复杂逻辑的“专家模式”。

下面是使用组合式风格重写的同一个“计数器”Store:

文件路径: src/stores/counterSetup.ts

1
2
3
4
5
6
7
8
9
10
11
12
13
14
15
16
17
18
import { ref, computed } from 'vue';
import { defineStore } from 'pinia';

export const useCounterSetupStore = defineStore('counterSetup', () => {
// state -> ref()
const count = ref(0);

// getters -> computed()
const doubleCount = computed(() => count.value * 2);

// actions -> function()
function increment() {
count.value++;
}

// 必须返回一个包含了 state 和 actions 的对象,Pinia 才能正确识别
return { count, doubleCount, increment };
});

如何选择?
对于初学者或逻辑清晰、职责单一的 Store,我们推荐从 选项式 开始。当你的 Store 需要处理更复杂的逻辑、响应其他状态变化(可以使用 watch)、或者你更偏爱组合式 API 的代码风格时,组合式 将是你更强大的武器。


1.5. 架构奠基:目录规范与类型先行

当我们的应用不再只有一个 counterStore,而是需要管理用户、购物车等多个状态时,一个清晰的组织规范就变得至关重要。

第一步:使用“桶文件”统一导出

为了避免在组件中出现大量 import 语句,我们可以在 stores 目录下创建一个 index.ts 文件,统一导出所有 Store。

文件路径: src/stores/index.ts

1
2
3
export * from './counter';
// 当有更多 store 时,在这里继续导出
// export * from './user';

这样,在组件中导入时就可以变得非常简洁:import { useCounterStore, useUserStore } from '@/stores';

第二步:类型先行,定义共享接口

专业的项目中,类型定义应该与具体实现解耦。我们约定在 src 目录下创建一个 types 文件夹,用于存放所有全局共享的 TypeScript 类型。

文件路径: src/types/user.ts

1
2
3
4
5
export interface UserInfo {
id: string;
username: string;
token: string;
}

现在,当我们创建一个 userStore 时,就可以直接复用这个类型定义,确保数据结构的统一和类型安全。

文件路径: src/stores/user.ts

1
2
3
4
5
6
7
8
9
10
11
12
13
14
15
16
17
18
19
20
import { defineStore } from "pinia";
import { ref } from "vue";
import type { UserInfo } from "../types/user"; // 从类型目录导入

export const useUserStore = defineStore("user", () => {
// state
const userInfo = ref<UserInfo>({
id: "",
username: "",
token: "",
});
// actions
function login(userInfo: UserInfo) {
console.log("login", userInfo);
}
return {
userInfo,
login,
};
});

“目录即规范,类型即文档”。建立 index.ts 桶文件和独立的 types 目录,是从第一天起就为项目的长期可维护性打下基础的最佳实践。


1.6. 响应式的“陷阱”与 storeToRefs

在掌握了如何定义和组织 Store 之后,我们来解决在组件中消费它们时最关键的响应性问题。

当我们想在组件的 <script setup> 中使用 Store 时,为了代码整洁,很自然地会想使用 ES6 的解构赋值。

1
2
3
4
5
import { useCounterStore } from '@/stores';

const counterStore = useCounterStore();
// ❌ 这是一个常见的错误!
const { count } = counterStore;

如果你这样做,并在模板中使用 count,你会发现,它是一个静态的值,不会随着 Store 的变化而更新。

痛点背景: 为什么会这样?因为当你用 const { count } = counterStore 解构时,count 会被提取为一个普通的、不再具有响应性的 number 变量。它与 Store 的原始 state 之间的响应式链接就此断开。

解决方案: Pinia 为我们提供了一个专门的工具函数 `storeToRefs` 来解决这个问题。

storeToRefs 会接收一个 Store 实例作为参数,然后将该 Store 实例中所有 stategetters 的属性,都转换为响应式的 ref 对象。

现在,我们来用正确的方式重写组件逻辑。
文件路径: src/App.vue

1
2
3
4
5
6
7
8
9
10
11
12
13
14
15
16
17
18
19
20
21
22
23
24
25
26
27
<script setup lang="ts">
import { useCounterStore } from './stores'; // 从桶文件导入
import { storeToRefs } from 'pinia'; // 1. 导入 storeToRefs

const counterStore = useCounterStore();

// 2. ✅ 使用 storeToRefs 来保证解构出的数据是响应式的
const { count, doubleCount } = storeToRefs(counterStore);

// 3. actions 是普通函数,可以直接解构
const { increment } = counterStore;
</script>

<template>
<div class="card">
<h1>Hello, Pinia!</h1>
<p>
当前计数:
<strong>{{ count }}</strong>
</p>
<p>
双倍计数:
<strong>{{ doubleCount }}</strong>
</p>
<button @click="increment">点我 +1</button>
</div>
</template>

关键原则: 在 <script setup> 中,如果你需要从 Store 中解构 stategetters 并在模板中使用,必须 使用 storeToRefs。而 actions 因为是普通的函数,可以直接解构。


第二章:核心工作流 · 构建一个完整的特性

摘要: 在本章中,我们将以一个最常见的“获取并展示用户信息”的功能为例,带领读者走完从 Store 设计、健壮的逻辑实现、到组件优雅消费 的完整开发闭环。我们将告别所有模拟数据,让 Pinia 第一次与真实的(Mock)API 对话,并最终学会如何将复杂的业务逻辑优雅地抽象封装,从而真正掌握构建一个完整特性的专业流程。


在本章中,我们将像在真实项目中一样,一步步构建一个完整的用户资料展示功能:

  1. 首先,我们将遵循“先设计,再编码”的专业流程,为我们的用户状态 Store 绘制蓝图
  2. 接着,我们将动手实现一个工业级的异步 Action,它将与 JSON Server 提供的真实 API 接口进行交互。
  3. 然后,我们将在 Vue 组件中优雅地消费这个 Store,并处理加载、错误、成功等所有 UI 状态。
  4. 最后,我们将学习如何通过订阅的方式,以一种解耦的模式为我们的 Store 添加持久化等副作用。

2.1. 蓝图:设计一个“用户状态” Store

在写下任何实现代码之前,专业的流程是先进行设计。我们首先要问一个问题:“一个健壮的‘用户状态’ Store 需要管理哪些信息?”

痛点分析: 一个只存放 user 数据的 Store 是远远不够的。当组件发起获取用户信息的请求时,它还需要知道:数据是否正在加载中?请求是否出错了?如果这两个状态缺失,我们就无法向用户提供清晰的加载反馈(如 Loading 动画)或错误提示。

设计先行: 基于痛点,我们共同设计出 userStore“三位一体” state 结构

  • user: Ref<User | null>: 存放核心的用户数据。
  • isLoading: Ref<boolean>: 标识数据是否正在加载中。
  • error: Ref<Error | null>: 存放请求过程中可能发生的错误。

同时,我们定义出它需要对外暴露的核心 Action:一个名为 fetchUser 的异步函数。

第一步:定义 User 类型

我们贯彻“类型先行”的原则,首先在 src/types 目录下创建 user.ts 文件来定义我们用户的数据结构。

文件路径: src/types/user.ts (新建)

1
2
3
4
5
export interface User {
id: number;
name: string;
email: string;
}

第二步:创建 Store 骨架

现在,我们在 src/stores/user.ts 文件中,写下这个包含了我们完整设计思路的“骨架”。

文件路径: src/stores/user.ts (新建)

1
2
3
4
5
6
7
8
9
10
11
12
13
14
15
16
17
18
19
20
import { ref, computed } from 'vue';
import { defineStore } from 'pinia';
import type { User } from '@/types/user'; // 从我们刚刚创建的类型文件导入

export const useUserStore = defineStore('user', () => {
// State: "三位一体"结构
const user = ref<User | null>(null);
const isLoading = ref(false);
const error = ref<Error | null>(null);

// Getter
const isLoggedIn = computed(() => !!user.value);

// Action ( अभी खाली )
async function fetchUser(userId: number) {
// 这里的逻辑我们将在下一节填充
}

return { user, isLoading, error, isLoggedIn, fetchUser };
});

2.2. 实践:实现工业级异步 Action

在有了清晰的“蓝图”之后,我们来填充 fetchUser 这个 Action 的“血肉”。

准备 Mock 后端与环境变量

为了让我们的 Action 能够与真实 API 对话,我们首先启动 json-server

文件路径: db.json (新建于项目根目录)

1
2
3
4
5
6
7
8
9
10
11
12
13
14
{
"users": [
{
"id": 1,
"name": "Prorise",
"email": "prorise@example.com"
},
{
"id": 2,
"name": "VueMastery",
"email": "hello@vuemastery.com"
}
]
}

文件路径: .env.local (新建于项目根目录)

1
VITE_API_URL=http://localhost:3001

package.json 中添加 mock 脚本并启动它。

1
2
3
"scripts": {
"mock": "json-server db.json --port 3001"
}
1
2
# 在一个新终端中运行
pnpm run mock

注意: 创建或修改 .env 文件后,必须重启 Vite 开发服务器才能让环境变量生效。

填充 Action 逻辑

现在,我们来完成 fetchUser 的实现,它将成为我们后续所有异步逻辑的“范本”。

文件路径: src/stores/user.ts (修改)

1
2
3
4
5
6
7
8
9
10
11
12
13
14
15
16
17
18
19
20
21
22
23
24
25
26
27
28
29
30
31
32
33
34
35
36
import { ref, computed } from "vue";
import { defineStore } from "pinia";
// @ts-ignore
import type { User } from "@/types/user"; // 从我们刚刚创建的类型文件导入

export const useUserStore = defineStore("user", () => {
const user = ref<User | null>(null);
const isLoading = ref(false);
const error = ref<Error | null>(null);

// Getter
// !! 表示将 user.value 转换为布尔值
const isLoggedIn = computed(() => !!user.value);

// Action
async function fetchUser(userId: number) {
isLoading.value = true;
error.value = null;
try {
// 从 Vite 环境变量中读取 API 地址
const apiBase = import.meta.env.VITE_API_URL;
const response = await fetch(`${apiBase}/users/${userId}`);
if (!response.ok) {
throw new Error(`Failed to fetch user with status ${response.status}`);
}
user.value = await response.json();
} catch (err) {
error.value = err as Error;
} finally {
// 无论成功或失败,最后都将加载状态设为 false
isLoading.value = false;
}
}

return { user, isLoading, error, isLoggedIn, fetchUser };
});

2.3. 消费:在组件中优雅地使用 Store

这是我们辛勤工作的“收获时刻”。我们将创建一个 UserProfile.vue 组件来消费 userStore,并利用我们设计的“三位一体”状态来构建一个健壮的响应式 UI。

第一步:基础消费与响应式 UI

文件路径: src/components/UserProfile.vue (新建)

1
2
3
4
5
6
7
8
9
10
11
12
13
14
15
16
17
18
19
20
21
22
23
24
25
26
27
28
29
30
31
32
33
34
35
36
37
38
39
40
41
42
43
44
45
46
47
48
49
50
51
52
53
54
55
<script setup lang="ts">
import { onMounted } from 'vue';
import { useUserStore } from '@/stores/user';
import { storeToRefs } from 'pinia';

const userStore = useUserStore();
// 使用 storeToRefs 确保响应性
const { user, isLoading, error } = storeToRefs(userStore);

// 在组件挂载时,调用 action 获取数据
onMounted(() => {
userStore.fetchUser(1);
});
</script>

<template>
<div class="user-profile-card">
<h2>用户资料</h2>
<div v-if="isLoading" class="loading">正在加载中...</div>
<div v-else-if="error" class="error">加载失败: {{ error.message }}</div>
<div v-else-if="user" class="user-info">
<p><strong>ID:</strong> {{ user.id }}</p>
<p><strong>姓名:</strong> {{ user.name }}</p>
<p><strong>邮箱:</strong> {{ user.email }}</p>
</div>
<div v-else>暂无用户数据</div>
</div>
</template>

<style lang="scss" scoped>
.user-profile-card {
border: 1px solid #ccc;
padding: 1.5rem;
border-radius: 8px;
width: 300px;

h2 {
margin-top: 0;
border-bottom: 1px solid #eee;
padding-bottom: 0.5rem;
}

.loading, .error {
color: #888;
}

.error {
color: red;
}

.user-info p {
margin: 0.5rem 0;
}
}
</style>

App.vue 中使用这个新组件。现在,你的界面将能完美地展示加载、错误和成功这三种状态。

第二步:最佳实践升华——抽象为 Composable

痛点: 上述写法虽然能工作,但如果另一个组件也需要获取用户信息,我们就必须重复一遍 onMounted 调用和 storeToRefs 的逻辑。

解决方案: 我们可以将这套“消费逻辑”抽离到一个可复用的组合式函数中。

文件路径: src/composables/useAuth.ts (新建)

1
2
3
4
5
6
7
8
9
10
11
12
13
14
15
16
17
18
19
20
21
22
23
import { useUserStore } from '@/stores/user';
import { storeToRefs } from 'pinia';
import { onMounted } from 'vue';

export function useAuth() {
const userStore = useUserStore();
const { user, isLoading, error, isLoggedIn } = storeToRefs(userStore);

// 封装副作用:如果用户未登录,则自动获取
onMounted(() => {
if (!user.value) {
userStore.fetchUser(1);
}
});

return {
user,
isLoading,
error,
isLoggedIn,
fetchUser: userStore.fetchUser, // 也可将 action 一并返回
};
}

现在,我们的组件可以变得极其简洁:

文件路径: src/components/UserProfile.vue (重构)

1
2
3
4
5
6
7
<script setup lang="ts">
import { useAuth } from '@/composables/useAuth';

// 一行代码,获取所有需要的数据和逻辑
const { user, isLoading, error } = useAuth();
</script>

这就是从“能用”到“优雅”的思维跃迁。Store 负责提供原始状态和原子操作,Composable 负责封装面向业务场景的组合逻辑,组件则只负责消费 Composable 并渲染 UI。这种清晰的分层是大型应用保持可维护性的关键。


2.4. 观察:通过订阅实现副作用

这一节我们将作为“锦上添花”的高级技巧来学习。

痛点: 我们希望在用户状态变化时,自动将信息保存到 localStorage,但又不希望这个“持久化”的逻辑污染 userStore 的核心业务代码。

解决方案: 使用 $subscribe 在 Store 外部,以一种解耦的方式,集中地响应 Store 内部的变化。

文件路径: src/main.ts (在 app.use(pinia) 之后)

1
2
3
4
5
6
7
8
9
10
11
12
13
14
15
16
17
18
// ...
app.use(pinia);

// 在 main.ts 中进行订阅,可以确保它是全局生效的
import { useUserStore } from '@/stores/user';
const userStore = useUserStore();

userStore.$subscribe((mutation, state) => {
// 仅在 user state 变化时操作
// mutation.events.key 可以帮助我们精确判断是哪个 state 发生了变化
if (mutation.storeId === 'user' && mutation.events.key === 'user') {
if (state.user) {
localStorage.setItem('user-info', JSON.stringify(state.user));
} else {
localStorage.removeItem('user-info');
}
}
});

通过这种方式,我们优雅地实现了“关注点分离”,持久化逻辑和业务逻辑各司其职,互不干扰。


第三章:生态与工具 · 善用巨人的肩膀

摘要: 一个强大的状态管理库,不仅在于其自身 API 的精妙,更在于它如何融入并赋能整个开发工作流。在本章中,我们将探索 Pinia 强大的生态与工具集。我们将首先精通官方 Vue Devtools,学会如何像“时间旅行者”一样调试状态;接着,我们将通过一个强大的插件,一劳永逸地解决状态持久化问题;最后,我们会将视野拔高,探讨 Pinia 在服务端渲染(SSR)场景下的核心注意事项,为你未来的全栈之路扫清障碍。


在本章中,我们将像资深工程师一样,为我们的 Pinia 工作流配备最精良的工具和知识:

  1. 首先,我们将深入 Vue Devtools,将我们的调试能力提升到一个全新的维度。
  2. 接着,我们将学习 Pinia 的插件系统,并以最常用的状态持久化为例,感受其强大的扩展性。
  3. 最后,我们将探讨 SSR 场景下的核心概念,理解 state 为何必须是函数等设计的深层原因。

3.1. 调试利器:玩转 Vue Devtools

痛点背景: 当应用状态变得复杂时,console.log 式的调试方法会迅速变成一场灾难。我们无法清晰地看到状态变更的完整轨迹,也无法轻松地回溯和复现问题。我们需要一个更专业的“驾驶舱”来监控和控制我们的“状态引擎”。

解决方案: Vue 官方浏览器插件 `Vue Devtools` 为 Pinia 提供了无与伦比的、开箱即用的支持。它将我们的调试能力从“文本时代”带入了“可视化交互时代”。

请确保你已在浏览器中安装了最新版的 Vue Devtools 扩展插件,可以在浏览器插件商城搜索得到

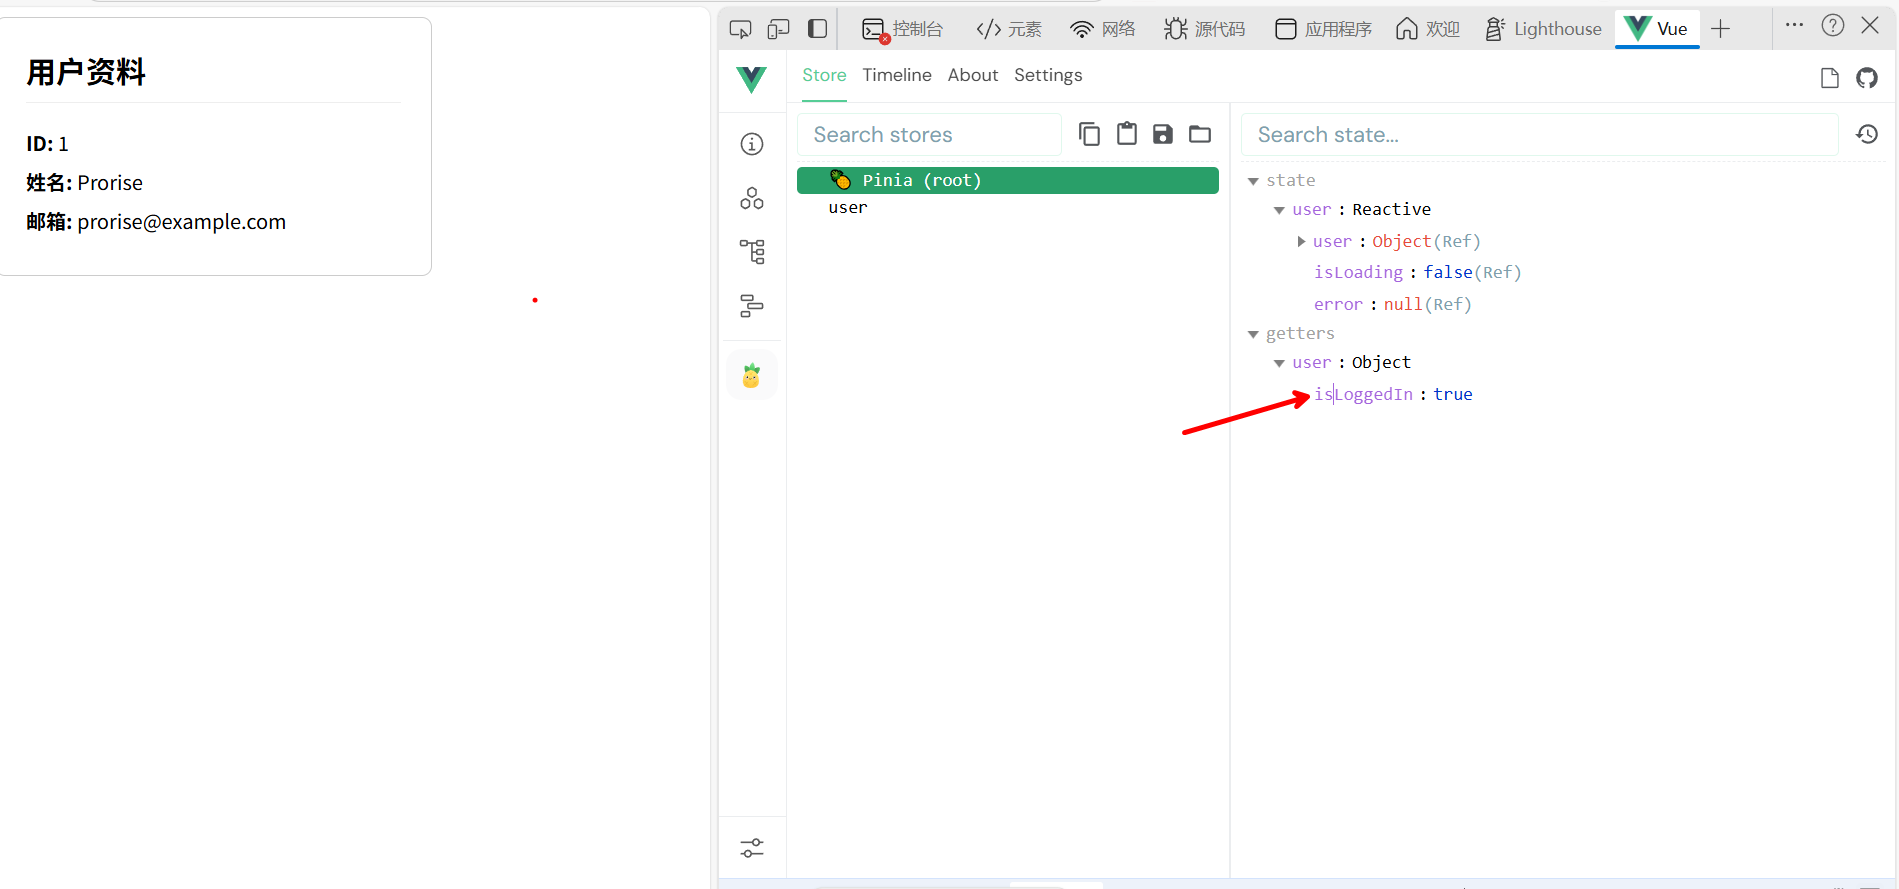
启动你的项目,并打开浏览器的开发者工具,切换到 Vue 面板。你会发现一个专门为 Pinia 准备的区域。在这里,我们可以实现:

  • 全局状态快照: 左侧会清晰地列出当前应用中所有已激活的 Store 实例 (counter, user 等),点击即可查看其 stategetters 的实时数据。你甚至可以直接在面板中修改 state 的值,并立即在页面上看到 UI 的响应式更新。

  • Action 与 Mutation 时间线: 这是 Devtools 最强大的功能。右侧的 “Timeline” 会记录每一次 Action 的调用和 State 的变更。

    • 追踪调用: 我们可以清晰地看到哪个 Action 被触发,传入了什么参数。
    • “时间旅行”: 点击任意一条历史记录,你的整个应用状态就会立刻“回溯”到那个时间点。这对于复现因一系列复杂操作导致的 Bug 来说,是“降维打击”级别的利器。

image-20250906143509720

养成使用 Vue Devtools 的习惯,是提升开发和调试效率的最佳投资。它能让你对应用的状态变化了如指掌,将你从 console.log 的海洋中解放出来。


3.2. 状态持久化:Pinia 插件系统实战

痛点背景: 我们在第二章实现的 userStore 有一个致命缺陷:用户登录后,只要一刷新页面,user 状态就会被重置为 null,登录状态丢失。我们当然可以通过在 main.ts 中使用 $subscribe 来手动写入 localStorage,但这并非最优雅、最通用的方案。

解决方案: 拥抱生态,使用专业插件。Pinia 拥有一个强大的插件系统,允许我们扩展其核心功能。对于状态持久化这个通用需求,社区已经有了公认的“黄金标准”——pinia-plugin-persistedstate

第一步:安装插件

1
pnpm add pinia-plugin-persistedstate

第二步:在 main.ts 中注册插件
文件路径: src/main.ts

1
2
3
4
5
6
7
8
9
10
11
import { createApp } from 'vue'
import { createPinia } from 'pinia'
import piniaPluginPersistedstate from 'pinia-plugin-persistedstate' // 1. 导入插件
import App from './App.vue'

const pinia = createPinia()
pinia.use(piniaPluginPersistedstate) // 2. 注册插件

const app = createApp(App)
app.use(pinia)
app.mount('#app')

第三步:在 Store 中开启持久化
现在,我们只需在需要持久化的 Store 定义中,增加一个 persist: true 选项即可。

文件路径: src/stores/user.ts

1
2
3
4
5
6
7
8
9
10
11
12
13
14
15
16
17
18
19
20
21
22
23
24
25
26
27
28
29
30
31
32
33
34
35
36
37
38
39
40
41
42
43
44
import { ref, computed } from "vue";
import { defineStore } from "pinia";
// @ts-ignore
import type { User } from "@/types/user"; // 从我们刚刚创建的类型文件导入

export const useUserStore = defineStore(
"user",
() => {
const user = ref<User | null>(null);
const isLoading = ref(false);
const error = ref<Error | null>(null);

// Getter
// !! 表示将 user.value 转换为布尔值
const isLoggedIn = computed(() => !!user.value);

// Action
async function fetchUser(userId: number) {
isLoading.value = true;
error.value = null;
try {
// 从 Vite 环境变量中读取 API 地址
const apiBase = import.meta.env.VITE_API_URL;
const response = await fetch(`${apiBase}/users/${userId}`);
if (!response.ok) {
throw new Error(`Failed to fetch user with status ${response.status}`);
}
user.value = await response.json();
} catch (err) {
error.value = err as Error;
} finally {
// 无论成功或失败,最后都将加载状态设为 false
isLoading.value = false;
}
}

return { user, isLoading, error, isLoggedIn, fetchUser };
},
// 这里就是最核心的关键点,我们只需要开启这个配置项即可
{
persist: true,
}
);

就是这么简单!现在,当你调用 fetchUser 成功获取用户信息后,user 状态会被自动保存到 localStorage 中。当你刷新页面时,插件会自动从 localStorage 读取数据并恢复 user 状态,实现了登录状态的持久化。

进阶配置
这个插件还提供了丰富的配置项,以应对更复杂的场景。

文件路径: src/stores/user.ts (进阶示例)

1
2
3
4
5
6
7
8
9
10
11
12
13
14
15
16
17
18
// ...
export const useUserStore = defineStore(
'user',
() => {
const user = ref<User | null>(null);
const temporaryToken = ref<string | null>(null);
// ...
return { user, temporaryToken, /* ... */ };
},
{
persist: {
// 指定存储方式,可以是 localStorage 或 sessionStorage
storage: sessionStorage,
// 指定只持久化 state 中的一部分数据
pick: ['user'], // 只有 user 会被持久化,temporaryToken 不会
},
}
);

这个例子完美诠释了“专业的事交给专业的工具”这一工程思想。通过插件,我们仅用一行配置就解决了复杂的持久化问题,让我们的 Store 核心逻辑保持纯净。